Layout planning takes vague dreams of a model railroad to a track plan which can be built. Our earliest plans might have simply been an oval of sectional track on the floor or sheet of plywood. We might have bought a crossing for a figure eight and turnouts so we could have spurs with perhaps a passing siding to allow us to run around our train and run two trains in opposite directions. With time we might acquire more space, become involved in a modular group or a club planning a layout, or simply want to up our game as we learn more about the hobby.
One place to begin is to find a layout plan in a magazine, book, or online, and build it as designed or modified to meet preferences and fit in the space available. Studying published layouts can help you decide what features you like best, what works and what does not for your space, time and budget.
Eventually, however, you want to develop your own design that fits your goals and resources perfectly, and that is what we will help you with here. This part of the Guide has three parts: an overview of the layout design process from that vague idea to a detailed plan; a presentation of best practices for a successful model railroad design; and a list of written resources to help you along.
Overview of the Layout Design Process
These are the planning steps that will be described below:
-
Step 1 – Capture your goals and resources
-
Step 2 – Prioritize the ideas and start to design trackwork
-
Step 3 – Add size and detail to the ideas to create a schematic or rough draft
-
Step 4 – Draw your track plan in sufficient detail to allow building benchwork and laying track
The steps are often repeated as you may need to go back to a previous step or steps and change the draft plan and take that forward to the next step.
Step 1: Goals and Resources
Establishing goals will help you focus on what is most important to you and will guide you in modeling what is in your mind's eye. Your goals do not have to be hard and fast and might change when you consider practical issues such as time, space, and finances.
Ask yourself:
-
Am I interested primarily in running trains over a mainline or in switching?
-
Do I want continuous running or the capability to run point to point, maybe with continuous running an option for open houses?
-
Am I interested in operations? In other words, simulate prototype railroad operations.
-
Do I plan to run the layout largely by myself or do I want to invite fellow hobbyists?
-
Do I want to freelance or to replicate a prototype?
-
Am I interested in a particular place and time?
Then move on to practical issues:
-
What is the available space?
-
How much time do I have to devote to building my layout?
-
Do I want it to look complete in a short time or will my vision need years to accomplish?
-
What is my budget?
-
Do I have friends who can help me build?
Probably foremost on the modeler's mind when starting on a new layout is the question of a place to put it.
For a room-size layout, is it to be around the wall or an island? The layout can run around the perimeter of your room, perhaps with peninsulas into the middle of the room, or it can be built in the middle of the room. Layouts around the perimeter are usually the most efficient for space.
How many openings to the room must be accommodated? The number and locations of doors are particularly critical in planning a layout and can determine whether it is to be an island or around-the-wall configuration. For an around-the-wall layout, windows may sometimes be blocked but doors will require a duck under or a section of the layout that can be moved in some way, usually a hinged gate. Duck-unders may present a physical barrier to many physically challenged or older folks. Hinged gates or even a detachable roll-away portion must be constructed precisely to operate reliably. Related to openings to the room is whether the room has other features that must remain unobstructed, such as closets in bedrooms, hot water heaters, heating and cooling systems, and electric panels in basements.
Of course, you do not need to cross the door if the layout is point to point. For a continuous run, the track can turn back on itself.
Will the layout be permanent or portable? Permanent means merely that the layout once built is intended to remain in one spot. If there is no space to devote exclusively to a layout, a small layout might be capable of being moved out of the way.
Layouts can be designed for the owner to display at a train show or some other venue. This is done rarely by individuals in the US but is not unusual for clubs and in other countries. In this case, the layout consists of modules or sections and the size can be dictated by storage space. Individuals might opt to build a home layout in modules when the probability of a move is high.
Throughout this discussion, we have assumed an indoor layout. However, many of the same questions apply to outdoor layouts, generally called garden railroads.
-
How much space do I have?
-
What are the required points of access from the house and perhaps other parts of the property?
-
Will the line go around the perimeter of a fenced-in or otherwise physically defined area or will it form an island in a lawn or garden area?
-
Will structures be weatherproof or needing to be taken up and moved back indoors?
Step 2 – Prioritize and Start Designing Trackwork
At this stage, you should have taken a good hard look at the space available. The next step is to create a drawing of this space, presumably to scale. In fact, draw it as large as you can. Drawings can be made with pencil on paper or on a computer using software designed specifically for model railroaders. For instance:
Some programs allow for printing 1:1, are helpful for designing complex trackwork, and useful for identifying where grading is required for outdoor layouts. You can use a general drawing or computer-aided design program, but specialized model railroading applications have tools and features such as libraries of templates for turnouts.
You can start to sketch track plans on your scale drawing, but you will want to move to drawing track plans to scale as early in the process as you can. Freehand track layouts tend to be overly optimistic in the quantity of track that can be fit in a given space and we all fudge the track radius and space taken up by turnouts.
There are several concepts and techniques for deciding how much space is required for the track plan and how much is to be devoted to scenery and buildings to provide the context for train operations.
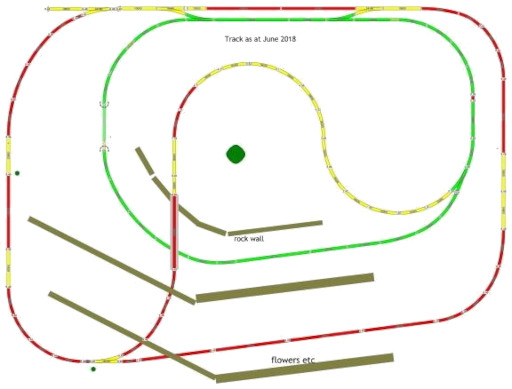
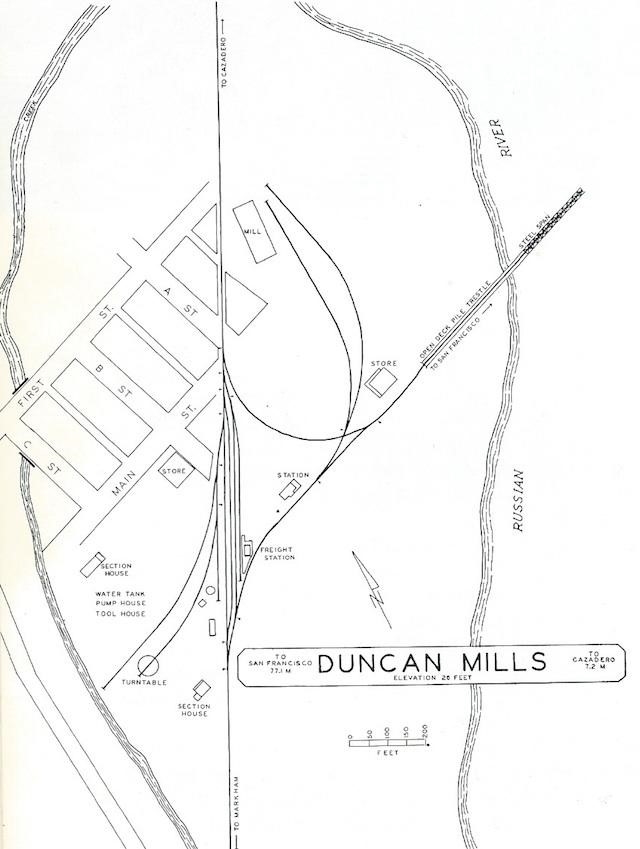
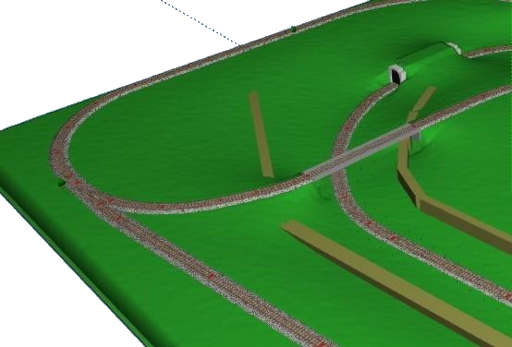
Layout Design Elements, or LDE’s, have been described by Tony Koester as visually and operationally recognizable elements of the prototype that you want to model in some detail. For example, an LDE for a small industry might include tracks for serving the industry as well as the mainline track and space for structures. A small town LDE might include a passing siding, a team track, and a mainline track in addition to a depot. Other examples are the junction between a branchline and the mainline; classification yard; rail to water transfer; engine service area; and balloon track used to reverse trains in a large terminus.
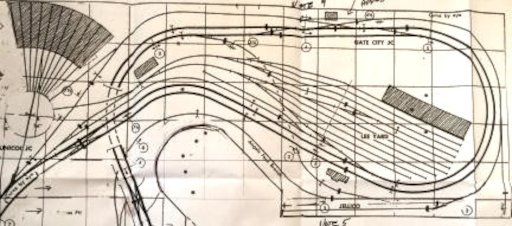
Prototype track configurations provide ideas for LDE's, such as this one for a small yard, engine facilities, and a coal transfer trestle.
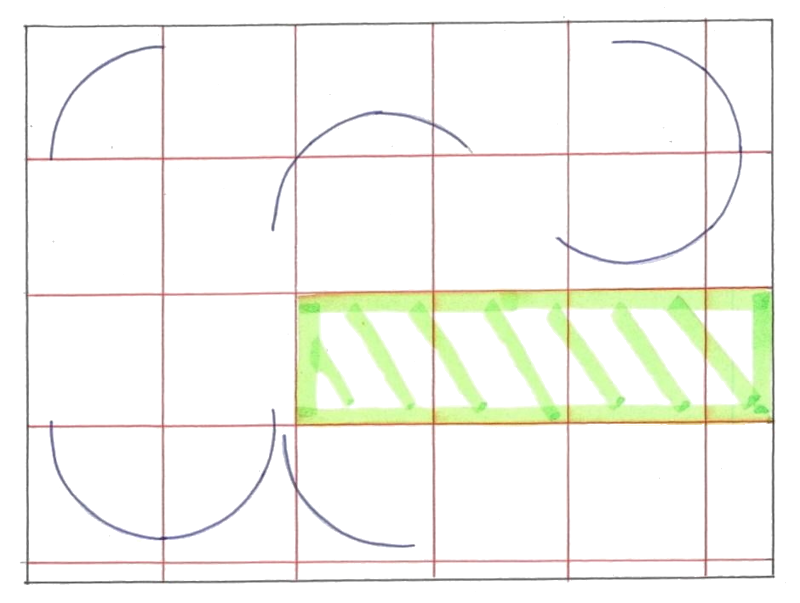
Layout squares by John Armstrong help you to design the places in your layout where the track must curve, such as in a corner and at the end of a peninsula. A track planning square contains a 90-degree curve of your minimum curve radius, the next larger curve radius, and the curved track clearance. It provides a realistic and accurate schematic for how much space is actually taken up by sections of curved track. Of course, curves can be broader in the final plan if there is space.
Dominoes is an idea by David Barrow which combines track planning with benchwork design. Using this approach a layout is planned as a series of sections or modules of open grid benchwork typically 2 x 4 feet in size that bolt together. Significant features such as yards will require several dominoes. In his style of layout there are no elevation changes; long, straight sections of track parallel the front edge; and the only curved sections are where tracks negotiate corners. The designer could use the concept of the LDE for individual modules and groups of modules. This approach is most appropriate for people planning principally toward operations. This concept has evolved over time from a way to plan benchwork as a series of modules to a way of thinking about the layout planning process.
The
One
Module
Approach or
TOMA, like dominoes, views a layout as a collection of modules, in this instance built one at a time, pretty much fully realized before progressing to the next module. The builder starts with a single small module with simple staging at each end, thus motivating the modeler who finds the prospect of planning and building a model railroad empire overwhelming. This approach was developed and described by Joe Fugate:
http://mrhpub.com/2017-08-aug/online/?page=22
Step 3: Add dimensions and Detail
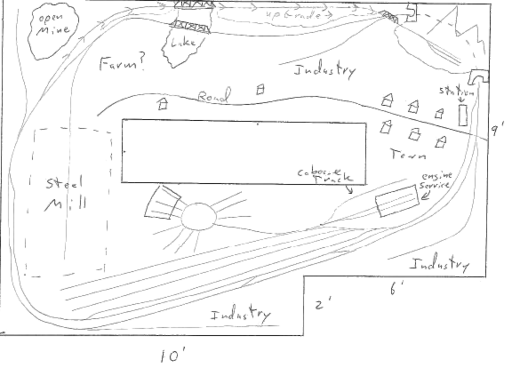
How can you use these approaches to begin designing a layout? You should start with that accurate drawing of your layout space. Identify areas for features you want to include on your plan, such as a small town, industrial area with lots of switching, a yard, a junction between two lines, and so forth. Draw these ideas as bubble diagrams or do a sketch like this:
You could sketch in some proposed benchwork, using layout squares in corners and the beginnings and ends of peninsulas. Meanwhile, you can convert some of the ideas expressed as bubbles into layout design elements. In fact, you could draw proposed LDE's on a separate page, cut them out, do the same for layout squares, and move these squares and rectangles around on your scale drawing to test out ideas. If you find building the layout as a series of modules appeal to you, think in terms of dominoes. TOMA suggests a starting point for building, perhaps to test out ideas and hone your skills.
Although the schematic is focused on the track plan, also think about how structures, roads, and other scenic elements will fit. For example, which tracks must have sufficient separation to provide room for the depot and possible freight house. As you decide where you want to place structures the track plan may need modifying. For example, moving an industrial spur.
Step 4: Create a Detailed Track Plan
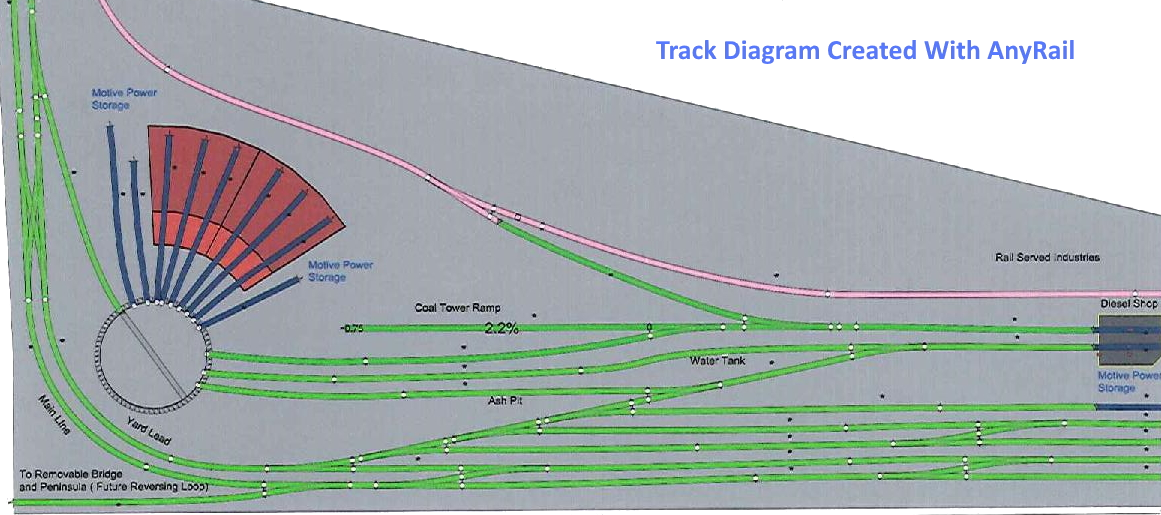
The final step is to draw a complete track plan with accurate track radii, turnout dimensions, track spacing, and grades, as well as LDE's, the mainline with sidings, branchlines, staging, yards, resulting in something like a blueprint for construction:
But hold up for a second. Moving from a rough sketch to a final track plan needs a few questions answered. For example: What track radius should you use in drawing layout squares? How much room do you need for an LDE? What about changing elevation? What tracks should a classification yard have to work efficiently?
Best Practices for Layout Design
You want your layout to run well mechanically, function well operationally, and look good. By running well we mean the equipment runs smoothly and can negotiate curves and grades. Functionally efficient layouts satisfy your goals for the type, frequency, and size of trains you want to run, as well as the types of work you want to do, such as switching or running mainline trains, while avoiding operational headaches.
Best Practices for Good Running: Let's start with the mechanical aspects. You want to establish a minimum track radius. This is obviously constrained by the available space. The smaller the radius the more track we can fit. But it also depends on the era you model, type of trains, the nature of your equipment, length of your trains, and the setting. Locomotives and rolling stock in the early days—let's say before 1900—were relatively small, and look right and run well on small-radius curves. The same goes for narrow gauge railroads, which in the real world were engineered to conserve space and to allow for smaller radius curves. In contrast, late steam locomotives, modern diesels, double stacks, and auto racks look best and run more reliably on track of larger radius. Long trains look bad and can derail on overly tight curves. One rule of thumb is that the longest reliable operational train is around three-quarters of the circumference of a circle of your layout’s minimum design curve radius. For example, a 27-inch minimum radius gives about ten feet of train length. Broad sweeping curves seem almost mandatory for mainline running on the American prairies, but tight curves look good and add to the personality of a logging or mining railroad in the mountains, whether standard or narrow gauge.
Plan easements, smooth transitions between straight and curved stretches of the track rather than abrupt transitions from straight to your minimum radius. From a straight section of track have it gently curve and gradually decrease in radius to the radius you want. Similarly, curves should gradually increase in radius. In fact, your equipment might tolerate a somewhat smaller minimum radius if you have easements. Trains look better if they don't suddenly jerk as they go into a curve or meet a tangent. Also, note that if you do need to use a sharp curve and have a choice where to place it, viewing it from the inside of the curve reduces the unsightly effect. For more on easements look here:
https://www.trackplanning.com/easements.htm and here:
https://www.nmra.org/sites/default/files/d3b3.pdf.
What size of turnout (switch) should you use? Turnouts come in several sizes, small no. 4, medium no. 6, and so forth, depending on scale, rail size, and brand. Smaller sizes reduce the space required for switch ladders in yards, whereas the larger sizes look better on the mainline and are less likely to cause issues with long rolling stock. The larger sizes require more space and the builder must often compromise. Many manufacturers provide templates for purposes of track planning, and model railroad planning software has different sizes in their track libraries. However you draw your refined track plan, make sure you allocate sufficient space for each turnout. You will most likely be surprised how much room that idea you drew on the back of an envelope takes in reality.
The length of Grades must be taken into consideration in your track planning. Make sure grades are reasonable, with room for smooth transitions at the top and bottom of the grade i.e. vertical easements, and sufficient clearance where one track goes over another. Anything more than a 2% grade will significantly impact the performance of your locomotives and limit train length. Again, era and setting can suggest the degree and magnitude of changes in elevation. A challenging grade requiring splitting trains or helper service can be used to your advantage if you want to add operational interest.
Here are a few more tips to keep in mind:
-
A long train sweeping through an “S” curve looks impressive, but such curves can cause derailments. If the straight distance between the curves is too short, the couplers on your rolling stock might not have sufficient side swing to accommodate the differing side movement of the ends of adjacent vehicles. A good rule of thumb is to separate the reverse curves of an “S” curve by a length of straight track longer than your longest vehicle fitted with body-mounted couplers. Also, be aware of “S” curves formed from adjacent turnouts.
-
Because coupling rolling stock can be a challenge on curves, use straight track or broad, sweeping turns in areas such as yards or industrial spurs if at all possible.
-
Build the benchwork to an appropriate height. Viewing the model railroad at eye level helps make it appear more realistic, but that level is too high to work on comfortably.
-
Leave some space between track and layout edge for scenery and safety of the equipment.
-
If you build a layout with multiple decks, allow sufficient clearance between decks for access and maintenance.
-
Provide sufficient width of aisles, especially if you plan to host operating sessions. A rule of thumb for aisle widths is 24 inches for single access, 36 inches for co-located operators (900 mm wide accessways and 1,200 mm wide operating areas). To prevent interference between operators, it's usually a good idea to avoid having areas of intensive switching opposite each other on a narrow aisle or one above the other on a multideck layout.
-
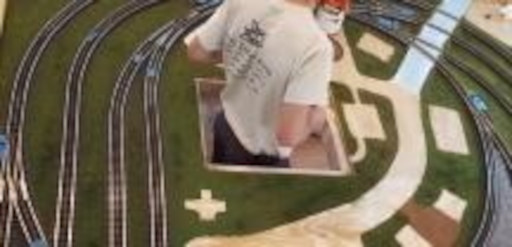
Ensure you can reach everywhere for layout maintenance. For emergency access to an out of reach part of the layout, provide an access hatch, a hole in the benchwork, and scenery which is sometimes concealed with a lift-out section of scenery.
Best Practices for Good Operations: A well-functioning layout has sufficient yard space, passing sidings, run-around tracks, and other elements to make for the efficient and realistic operation of a model railroad. Specific LDE's depend on the purpose of the railroad in the mind of the owner. Whether the purpose is to expeditiously run freight from one end of the railroad to the other, simulate car classification and train-building activities, drop off and pick up cars in a busy industrial district, or any other purpose, the railroad to work must follow certain practices and adhere to standards.
If you want to run more than one train at a time, you will need to provide passing sidings so that one train clears the mainline to accommodate a train coming from the opposite direction or an overtaking train of higher priority. To avoid operational headaches, ensure that your passing sidings are at least as long as the longest train you expect to run. You could plan a double-track mainline, but this is a space-eater that decreases the apparent size of a layout. In addition, a single-track mainline adds an operational interest that simulates that of an actual railroad. Of course, a double mainline may be appropriate for a very large layout that is trying to capture the look of a major railroad prototype. Passing sidings double as runaround tracks for switching areas. The engine doing local switching can work without occupying the mainline except for runarounds. The need for a switcher to vacate the siding when two trains are scheduled to meet adds operational variety.
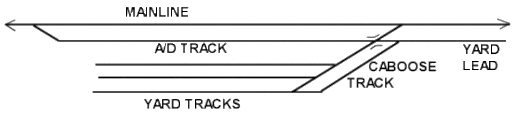
There are too many types and designs for yards to be described in detail, but a common feature on medium to large layouts is a classification yard. Yards can be designed to be efficient and fun for the operator. The primary rule is to provide enough tracks for the person doing the switching to be able to stay off the mainline for most of the switching moves, perhaps only when the locomotive must run around the train. In addition to classification tracks, you want an arrival/departure track to break down the train and assemble a new one, and a switching lead independent of the mainline. Here is a very simple yard that, although small, should be efficient to operate.
Double-ended yards allow two people to work, but they take up a lot of room and are appropriate for only the largest model railroad. That is unless your greatest enjoyment is in breaking down and building trains and you want your classification yard to occupy a large part of your layout.
Note that yard ladders should ideally be built with the shortest track nearest the aisle where the person stands while switching and the longest track towards the back. This arrangement makes it possible to see the first one or two cars on each track for reading car numbers and for coupling and uncoupling.
To give your layout purpose, you will need an origin and a destination for your trains. One of the goals of staging is to give the illusion that the visible layout is a part of a larger system. There are several ways of doing this:
-
Staging tracks--also known as holding tracks-- at each end of the layout and perhaps at intermediate points where trains can be held until the time for them to appear, only to disappear in staging tracks at the end of their journey. Major staging can comprise a number of parallel tracks reached via a ladder of switches, much like a classification yard. Staging tracks should be as long as the longest train you intend to run and should number however many trains you expect to operate. Staging can be as simple as a single track representing a branchline, disappearing behind buildings or trees, or into a tunnel. For example
https://model-railroad-hobbyist.com/node/15594
-
-
Looking Good: As you work on your design, step back occasionally and ask yourself: “Does it look good?” Whether a model railroad looks good is hard to define and is very much the decision of the designer/builder. The discussion above points out in several places that well-designed trackwork both runs well and looks good. Looking good is a function of both the static appearance of a scene or trackwork and the dynamic appearance of a moving train, including mainline running and switching. This section will touch only briefly on the aesthetics of layout design because, again, much depends on the vision of the layout owner. Ask yourself: “Does it look 'railroady'?”
You can learn much from books, magazine articles, Internet blogs, online discussion groups, and one's own observations of railroading. Ask yourself what appeals to you and why. When you turn to your own design, there are some generally agreed-upon practices that improve the looks of the layout. Many of them are described in the resources listed below and won't be listed here. A few examples are:
-
Build broad sweeping curves rather than long straight stretches of track. They look more realistic and make the layout look larger.
-
Avoid straight sections parallel to the front of the layout to de-emphasize the edges.
-
Avoid having tracks at different elevations in a scene run so close that they create the need for a sheer cliff or high retaining wall.
-
Provide sufficient room for buildings and scenery appropriate to the look you want to achieve.
You can check your plan by making a physical or virtual three-dimensional mockup of track, scenery, and structures. For example, construct a one-fifth scale model on a sheet of plywood the shape of the space the layout will occupy. Mockups help you see whether the layout can be built, whether there are problems of clearance, and whether scenes are going to look right.
As you look at your design, ask yourself whether it is consistent with the prototype you are modeling or, if you are freelancing, consistent with the type of railroad you are modeling. A large part of model railroad planning and construction requires compression, but this can go too far. You might be better off with one large industry than two unrealistically small industries on a spur. The temptation to reduce track radii to fit in more track is strong, but to an extreme, this only looks good when representing urban switching districts. Finally, ask yourself whether it fits your vision, you have the resources to build it, and whether it looks “railroady.”
For further Information
Websites and online discussion groups provide resources for ideas and plans as well as critiquing plans. For example:
Videos
Books