Not long after you have decided your scale, track plan, built your bench work and started running a train over the new layout you will start to imagine that there is something beyond the track, a small part of the world to be filled in with hills, valleys, buildings, and all the other things we see around us. We call this scenery. It comprises the basic landform, its color and texture, rocks, grass, bushes, streams, trees and all the other aspects of nature you want for your miniature world. It also includes manmade structures such as houses, stores, factories, roads and so on, but we'll cover those in another section.
Unlike laying track or wiring which are crafts, scenery, which does involve technique, is largely an artistic endeavor. You may be copying a photo or reproducing a picture you have in your mind. In both cases you are creating a three-dimensional representation, and it has to feel and look right to you. Take another look the next day. Is it what you have in your mind or does it need some tweaking? That's art.
As you learn the techniques and the materials you will get better and better. Don't be afraid to experiment on and off the layout. There is nothing in scenery that can't be repaired or done over.
Creating Landform
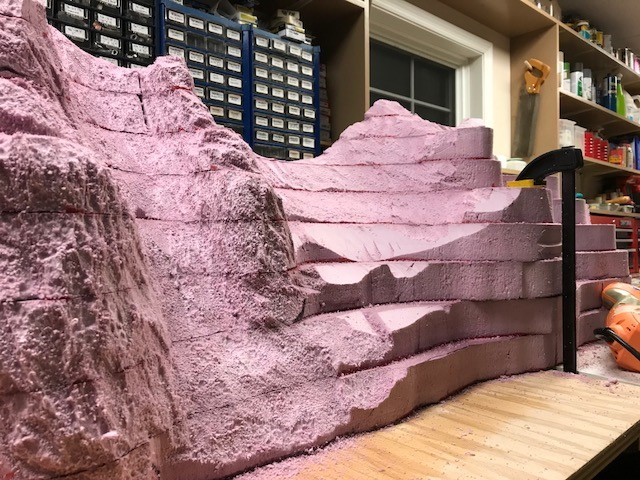
While many methods have been used over the years two currently stand out: 1.) carved layers of structural Styrofoam board and 2.) plaster-impregnated gauze molded over a lattice of cardboard strips or wadded-up paper. Styrofoam sheets can be found in the big box home improvement stores in 4'x 8'sheets in 1"and 2"thickness. The pink (Owens-Corning) or blue (Dow) are best. Avoid using white foam which crumbles into beads. Plaster gauze is generally available at hobby shops in 12" wide rolls.
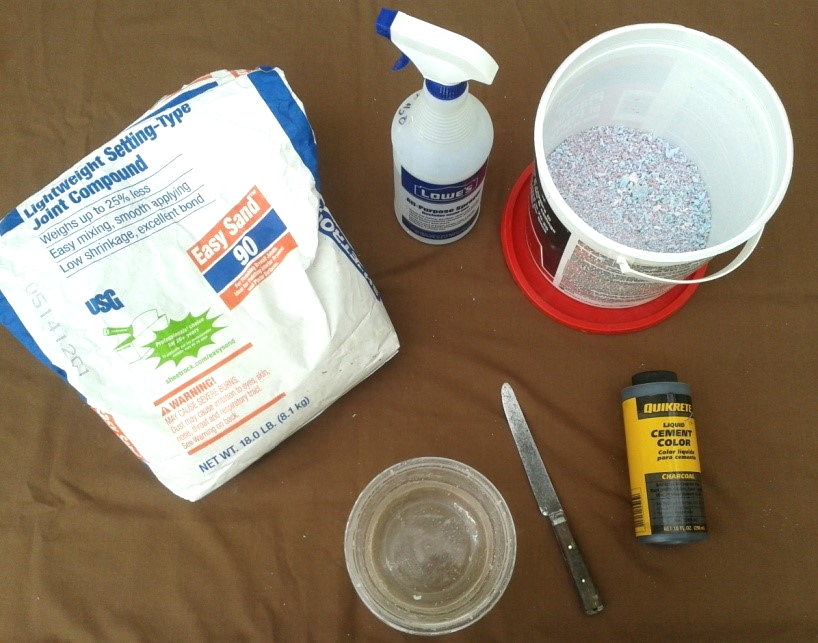
To use Styrofoam to make hills cut it into layers representing the contours of your hill, each higher layer a little smaller than the one below. Next glue them together using panel adhesive. Make sure it is compatible with Styrofoam. Another way is to use low temperature hot glue. This goes faster and the foam is ready to carve sooner. The next step is to use a long-bladed utility knife or a hotwire foam cutter and carve off the steps to create the slope of the hill. Then smooth out those slopes using a Shurform file or 40 grit sandpaper. A much faster way is to use a drill/driver with a cup style wire brush. This takes a little getting used to but works well. Make sure you spray the foam with water to prevent the particles from getting all over. You can then paint over the textured surface or cover it with a filler "goop" such as Sculptamold, available at most hobby shops. Another option is US Gypsum’s Easy Sand 90 Lightweight Setting-Type Joint Compound available in 18lb bags at Home Depot. Adding "goop" also allows you to embed small rocks or plaster rock castings.
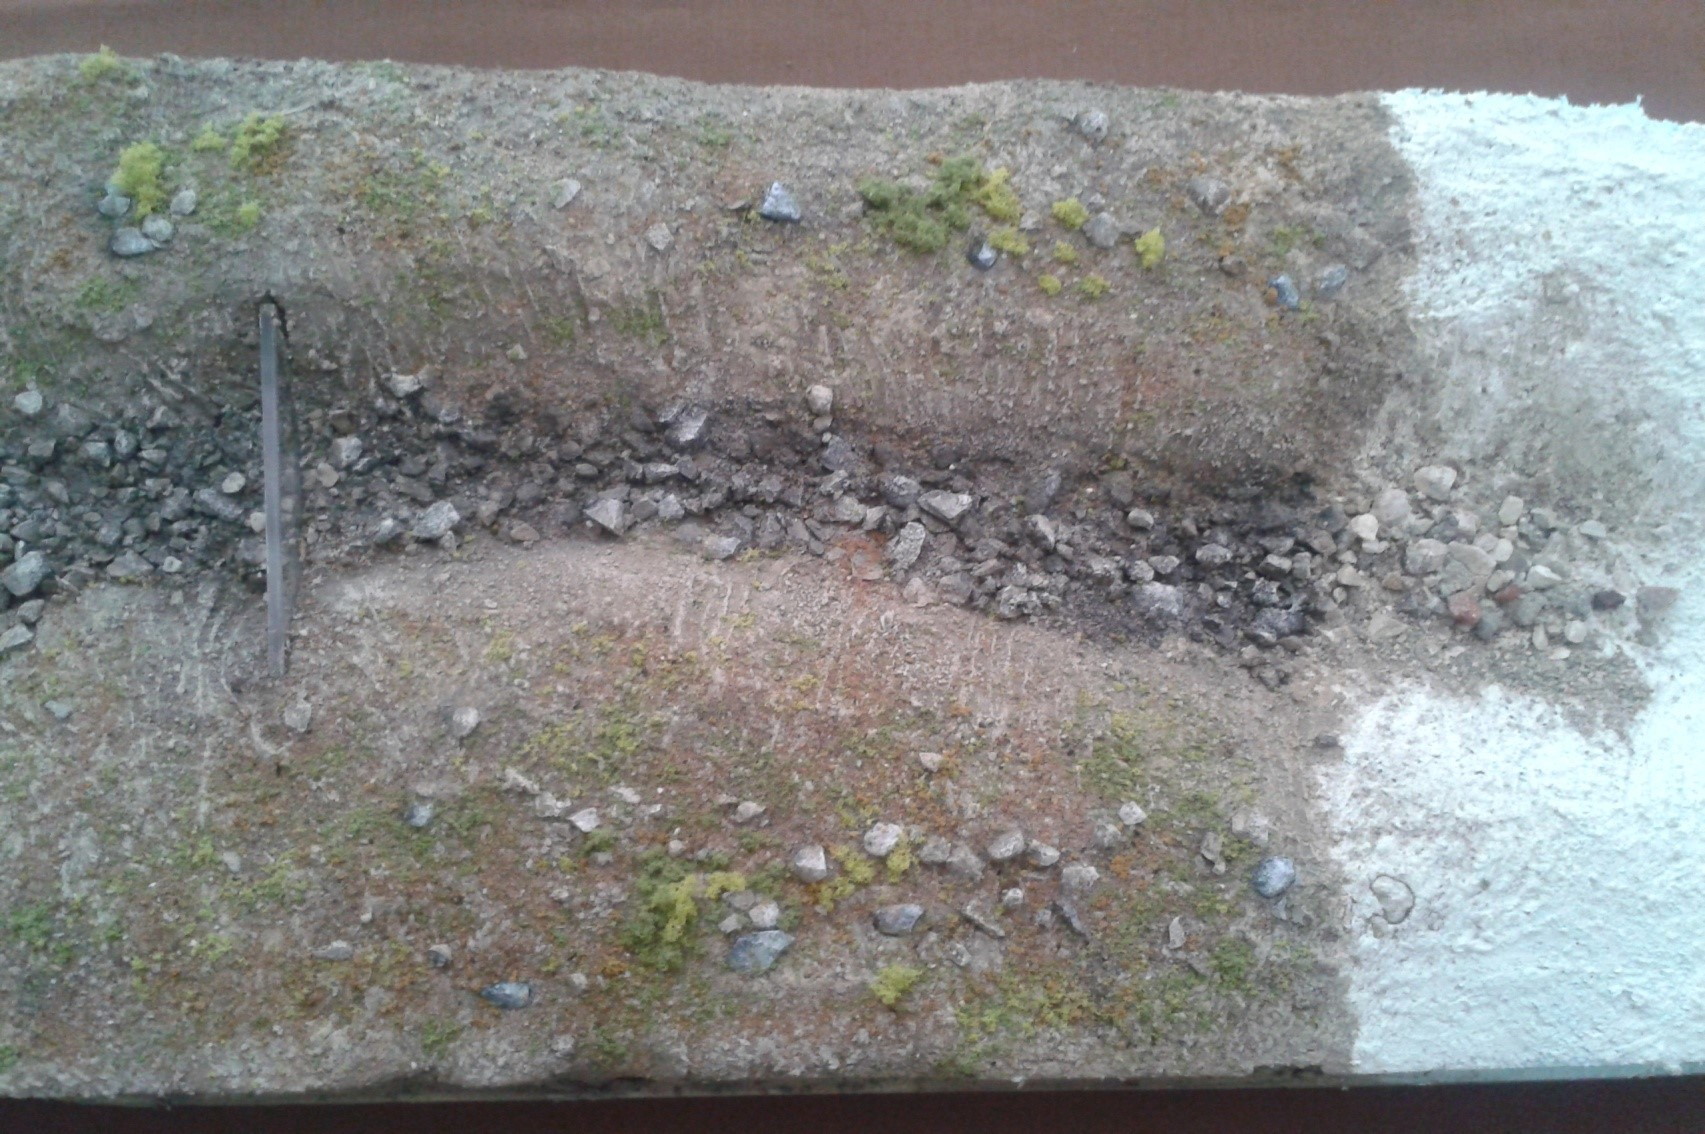
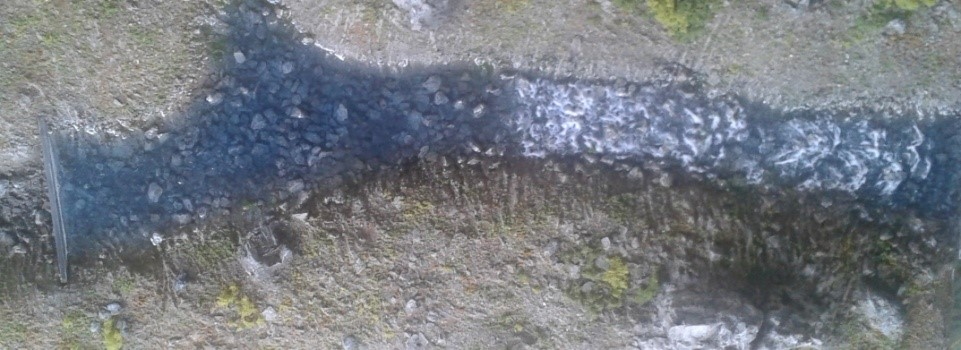
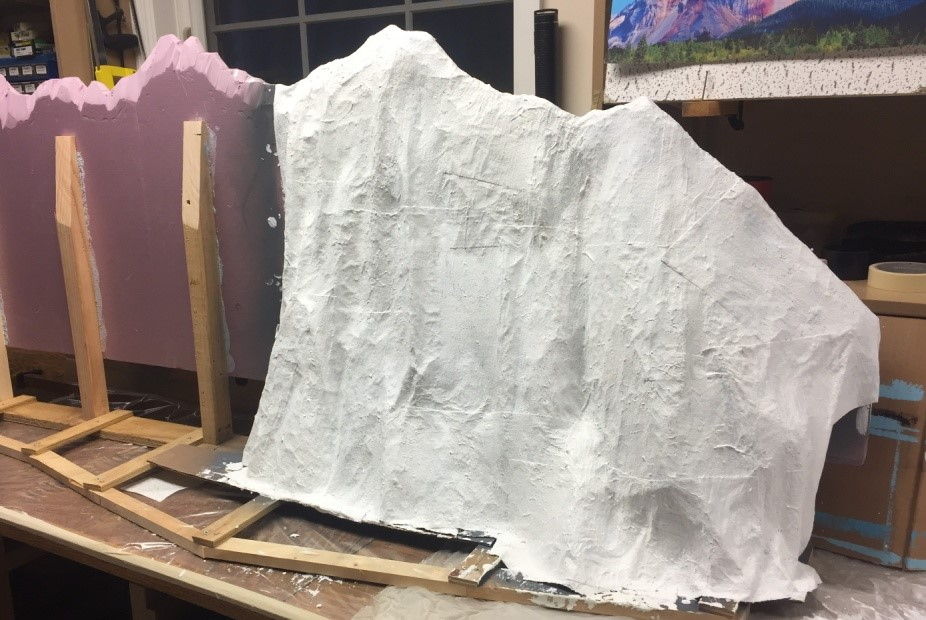 Using plaster gauze
To use plaster impregnated gauze, you first need to make a form to simulate the basic shape of the hill. This can be done with wadded up newspaper held down with masking tape or corrugated cardboard strips which are stapled or hot glued down at one end and attached to a stick or a ridge board at the other end at the top of the hill. Horizontal strips are interwoven through the vertical pieces to complete the form. Once this is done, cut square pieces of the gauze, dip each one into a shallow pan of water for 4 -5 seconds, and drape it over the form. Overlap successive pieces about 25% until the form is completely covered. The plaster will take several hours to set before proceeding.
Large rocks and rock cliffs need to be added to the landform before adding ground cover. You can certainly use actual rocks that look good as miniature rocks. However, they are heavy and not easy to find in quantity. The most prevalent way to make rock is to use plaster castings. These can be purchased or made using latex molds, which in turn can be purchased or made.
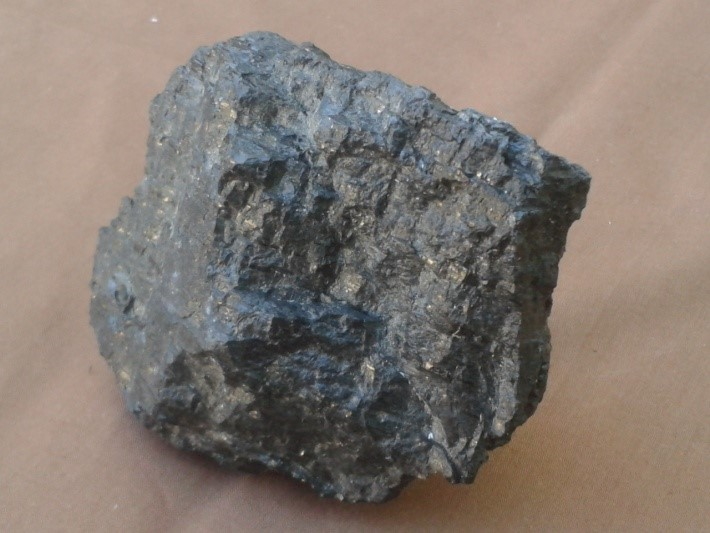 Coal makes great form for rock molds
Latex Molds - Let's start here. Purchase some liquid latex. This is readily available at hobby shops or craft stores such as AC Moore or Michael's. Find a rock that looks good in miniature. Large chunks of coal make super masters. You'll need a number of molds, so think about making several at the same time. Wash the rocks with detergent and rinse off. Stir the liquid latex and using a 1" to 1 1/2" throw-away foam brush, brush on a coat of latex covering the part of the rock you want to replicate. Let dry for several hours, but immediately clean the foam brush in detergent and hot water. If you're lucky a single brush will get you through all five or six coats of latex which you will continue to apply. If any of the molds is any larger than 3" to 4" across, after five coats you may want to reinforce it with a layer of cloth embedded in the final coat. To do this cut a piece of woven - not knitted - cotton fabric (an old bed sheet works great) slightly larger than the mold. Apply a coat of the liquid latex then immediately push the cloth into the wet latex and apply another coat over the cloth. Let dry, and you are done.
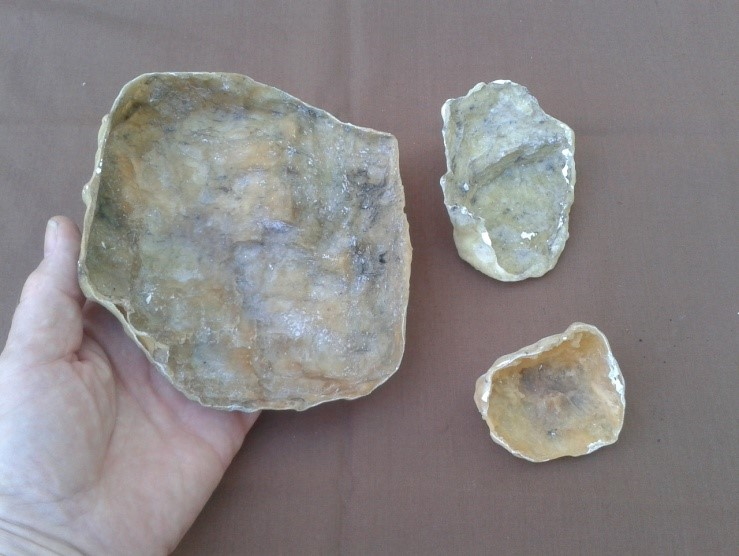 Latex rock molds
Plaster castings - This is the next step. Buy a bucket of Plaster of Paris, again at a craft store.
This makes the best rocks because it can be carved and, counter intuitively, because it can be easily broken or nibbled away. Like you did with the molds consider making several at a time. Clean the molds with detergent and water and lay them out. Next mix a small quantity of plaster with water. It should be the thickness of pancake batter, essentially as thick as you can pour. Pour a thin coat into each mold. Using a 1/2" flat stiff bristle brush, (as used in oil painting) you can push the plaster around in each mold to make for a thin but uniform coating. Now you have to mix and apply the plaster very quickly because it will start to set in about five minutes, so work quickly. Let the plaster cure for at least four hours. When you are ready to remove the castings very carefully peel back the edges of the mold by pulling back along the back surface of the mold rather than away from the mold. You will break some, but with care most will come out okay.
Applying Castings to the Landform - First fit the casting to the surface. If you need to remove a little material from the edge do so by crushing the offending edge with pliers. Don't grab the edge with the pliers and try to break it off by bending from the other side of the casting. It will break somewhere else and ruin the casting. You can also file off the high spot using a cobbler's rasp or other coarse file. Difficult to explain; easy to do.
Next mix up a small amount of your favorite "goop" as previously described and apply a ring around the edge of the casting then gently press into the landform. Using a 1/2"wide bristle brush push the "goop" around to blend the casting into the landform and stipple it to replicate the ground texture.
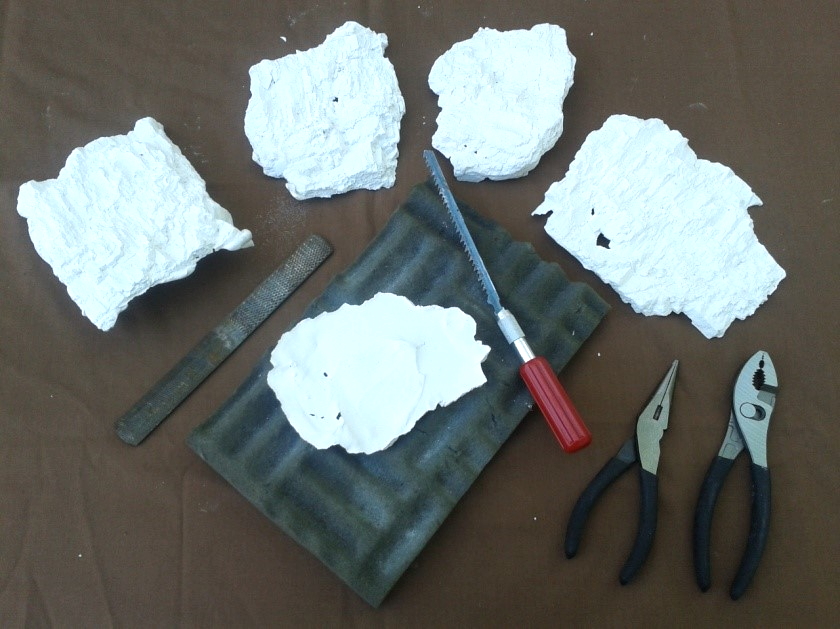
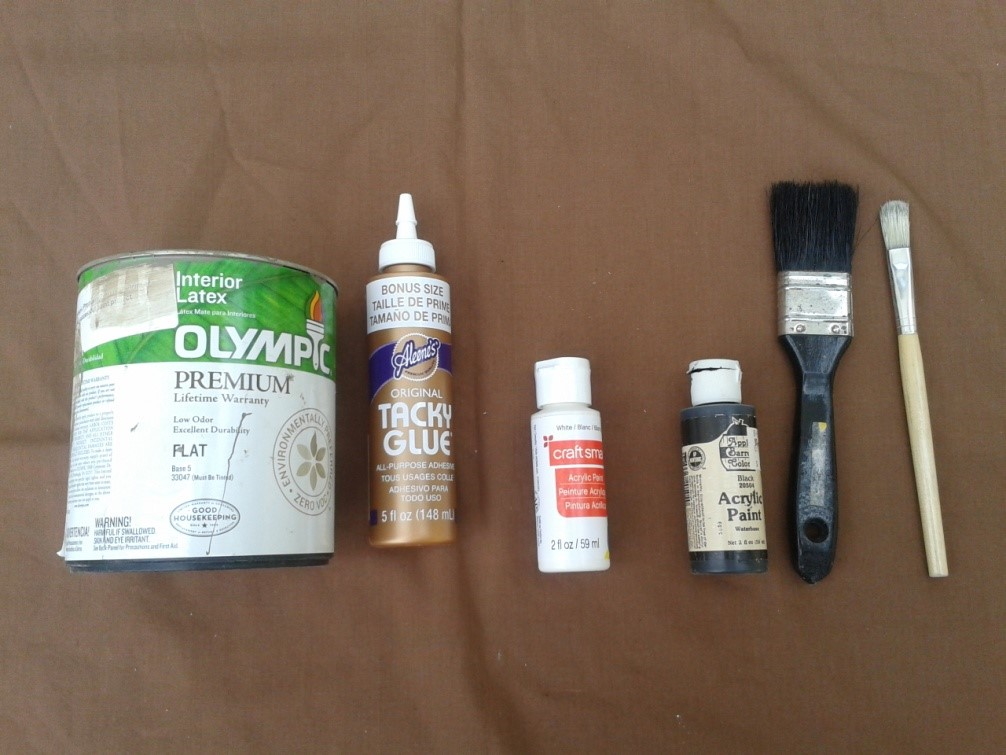
 Tools & materials to make US Gypsum Sheetrock brand Goop
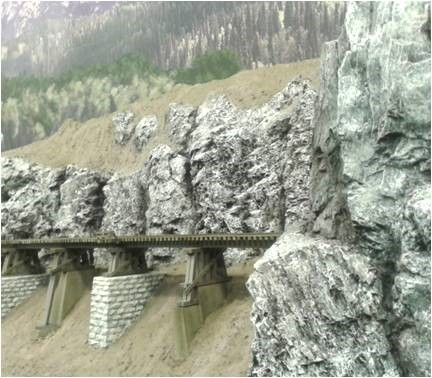
Making Rock Cliffs - These are done in a similar manner. The big difference is fitting multiple rock castings together, so they look like a continuous rock structure. This is like putting a jigsaw puzzle together where you first have to trim the pieces to fit together. First try to make a best fit of several castings. When you have two fitting together well using toothpicks or long steel pins pressed into the landform to hold each casting in place. Toothpicks work well with Styrofoam board while pins may be needed with plaster cloth scenery. Continue fitting and nibbling more castings until you reach the overall size you want.
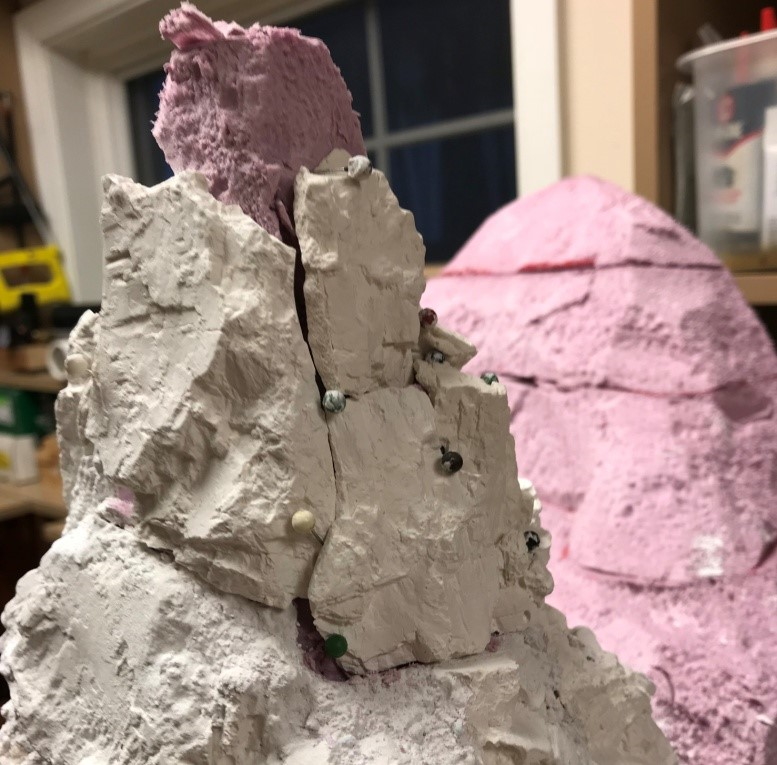 Fitting & securing rock castings together to form rock cliff
For the final installation remove one of the castings, apply your "goop” then press the casting back into place. Then move on to the next one and so on. Stipple the "goop" as it starts to firm up, to blend and let dry.
Painting Your Rocks - While there are a number of techniques, two stand out. One uses acrylic washes followed by dry brushing; the second employs a stippling technique using full strength acrylics. For the wash method mix up your rock colors using acrylics cut about 50% with water. You can use several different colors if you want. Brush or spray these on your rocks. Follow immediately by brushing a black wash on the side shaded from the sun. Let dry, then using a very light shade of the base colors get a brushful and wipe off almost all of the paint until there is just a slight fog when you drag the brush across a paper, no streaks or blobs. Then brush across the sunlit areas of the rock which will lighten slightly bring out the sun, and you're done.
 Matching stipple painted rocks cliffs
 Backdrop with prototype rocks
To do the stippling technique mix three shades of your rock color using acrylic paints: light, medium and dark. After determining the light and dark sides of the rock, paint the dark side, with the dark shade. Dip the tip of the brush in the dark paint then stab at a piece of scrap paper a few times until the bristles deposit tiny specks of paint (a stipple) without any blobs, then lightly stab at the rock (stipple) around to the light side with the fewest amount on the light side. Next go to the medium shade. Stipple the dark side just a little, then more in the mid-range and light sides. Finally using the light color paint stipple the mid area a little and the light side a lot. This yields the right shading and actually adds visual detail.
 Latex & white & black acrylic paints, glue and brushes
Painting Landforms and Adding Dirt, Grass, Shrubs, and Trees
You need to decide what is the underlying color and texture you want. Looking at photos of terrain in the part of the country you are modeling is helpful. Use Google images. Is it completely covered with grass and weeds or are there areas of bare dirt? If the former, you may choose a green color. If dirt, a brownish paint is in order. Use flat latex wall paint for the landform in general. For small layouts a sample size jar may be enough. You may also want to buy bottles of acrylic craft paint colors to vary the base ground color, including both black and white to darken or lighten as required. A small plastic paint pallet to mix small batches is in order as well. (Get one with a cover, so your paints will last longer before drying out.) All of this is available in the craft stores.
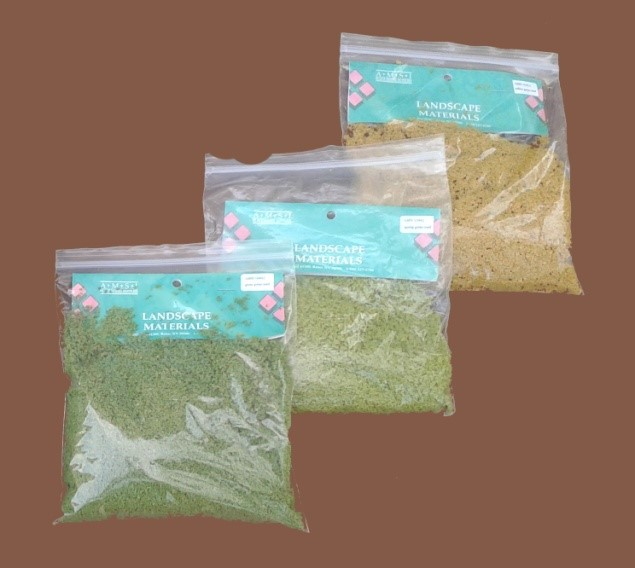
Vegetation and Dirt - For the former, ground foam seems to be the universal choice. This comes in a wide spectrum of colors and sizes and is offered by Woodland Scenics, Scenic Express, Heki, Noch as well as a host of others.
Actual dirt can also be purchased from Arizona Rock & Mineral Co. or the other scenery companies listed above. Another approach is simple: go outside and look at the soil around your home area. The sandy varieties are better than clay dirt. If you find some you like, scoop it up into Zip Lock freezer bags. When you get back home spread it out in a baking pan and bake it for an hour or so. Best do this Multi-color ground foams using a disposable pan on your barbecue grill. The baking dries the dirt and kills any bugs or germs. Sifting the dirt gets rid of extraneous debris.
 Real ground-up rock from Arizona Rock and Mineral Company
Painting the Landform & Applying vegetation and Dirt - You can embed these right in the paint or simply cover the terrain with paint. If not quite ready with your ground cover, adding just a coat of paint lets you see the terrain and may help your creative juices. If you want to embed as you paint, add about 25% white glue such as Elmer's or Aleene's to the paint to give more adhesion. This particularly helps on slopes. Paint about a square foot of area then sprinkle the ground foam and/or dirt into the paint mixture. You may let it dry as is or spray with wet water, (water with a teaspoon of dish detergent per quart), and with an eyedropper, add a dilute water/glue mixture, (1 part white glue to 4 parts water), for additional adhesion.
Static Grass, Polyfiber Bushes & Other Details - A good rule of thumb is to add larger scenery details after smaller ones, i.e., trees after large bushes, after grasses, after dirt. So now that we have your ground foam and/or dirt in place what's next? Grass is a good choice. Now this is not the bright green lawn grass that we'd all like our lawns to have, but grass & weeds that grow by the road or tracks, in pastures and fields. If this is in order, static grass is a great choice. This comprises rayon fibers, which take an electrical charge and can be made to stand up.
WOW! They come in a variety of colors, and lengths: 2mm, 4mm, 6mm, 8mm and 12mm. The longer fibers best represent wild grass and weeds. You will need an applicator to apply static grass. This is a device that holds the grass fibers and gives them their charge. You apply slightly diluted white glue (about 2 parts glue: 1 part water by volume) or better yet Matte Medium (instead of the white glue) to the terrain and then shake the applicator about a 1/2" above the surface over the area. The fibers come out and are attracted to the oppositely charged terrain and stand up quite realistically. Both static fibers and applicators are readily available in hobby shops. The higher priced applicators tend to work much better than the low-cost ones. Noch, Woodland Scenics and Scenery Express are several of the companies that sell static grass and applicators.
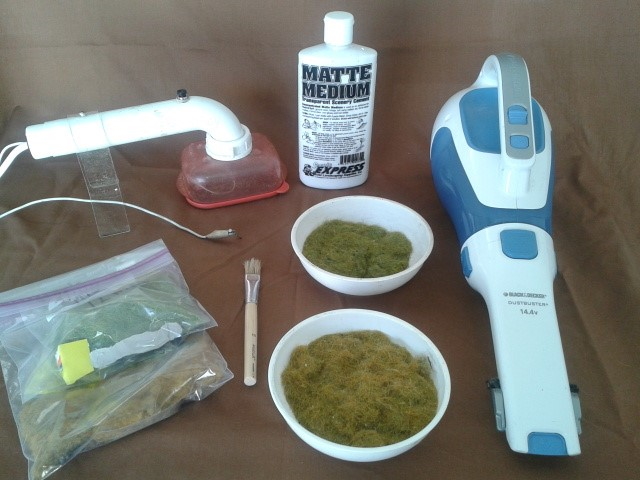 Static grass Tools & materials (Home-built Applicator and Hand vacuum)
Several colors of poly fiber, paint to vary its color, ground foam to sprinkle on and hair spray to fix the ground foam.
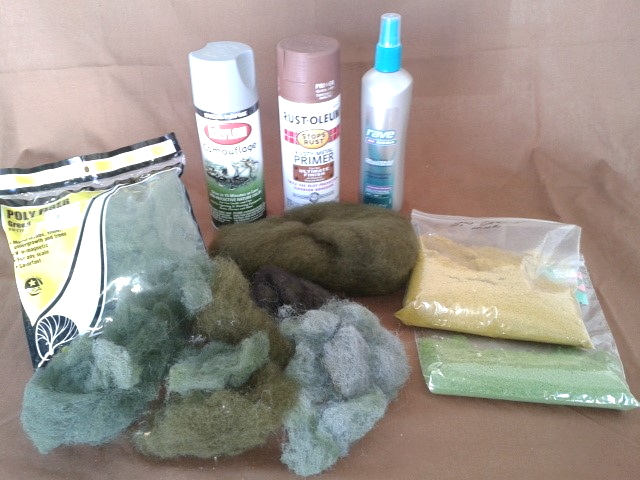 Poly fiber
Bushes are Next - Lots of varieties here. Large clumps of ground foam can be used, also Lichen, a natural plant, is available in hobby shops and craft stores. This has a very fine branch structure. Another one is polyfiber with ground foam sprinkled on after spraying with hairspray. Yup, hairspray makes a good adhesive. This technique makes a very airy, open type bush, and is one of the best. If you have put down static grass and want some polyfiber bushes, the polyfiber is nicely secured by the sprigs of grass. Bushes can also be glued down with a bit of white glue. Woodland Scenics, Scenic Express, Noch, Heki and others have lots of special bushes.
Trees - There are lots of different kinds of trees. But, before we get into specific varieties It's helpful to think of several different categories: background trees and foreground trees, and on large layouts sometimes even middle ground trees. When a section of the layout is largely covered by trees and is two feet or more from the viewer, modelers often use forced perspective to make the layout look larger. This involves making the trees in the background a little smaller than those in the foreground. They can also be less detailed and a bit duller. Now another thing about trees is that even on a medium sized layout that involves woodlands you will likely need a lot of trees. So, combining the two notions suggests the majority (60% to 80%) will be smaller, less detailed background trees with fewer (20% to 40%) but larger, more detailed varieties up close. This is good because background trees can be very inexpensive (or free) and require little to no prep work by the modeler. Large foreground trees are expensive or if you make them, they take lots of time. So, with this mind let's discuss some of the different kinds.
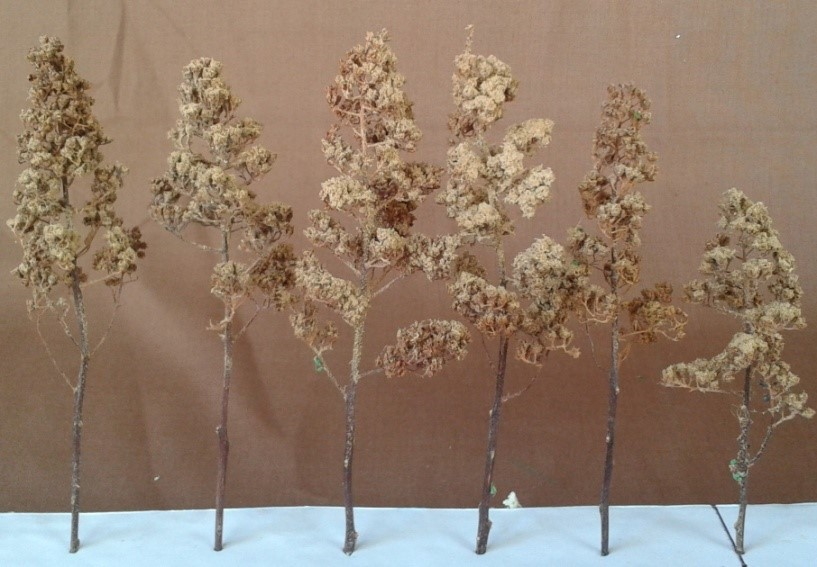 Meadow sweet found in the northeast makes great background trees
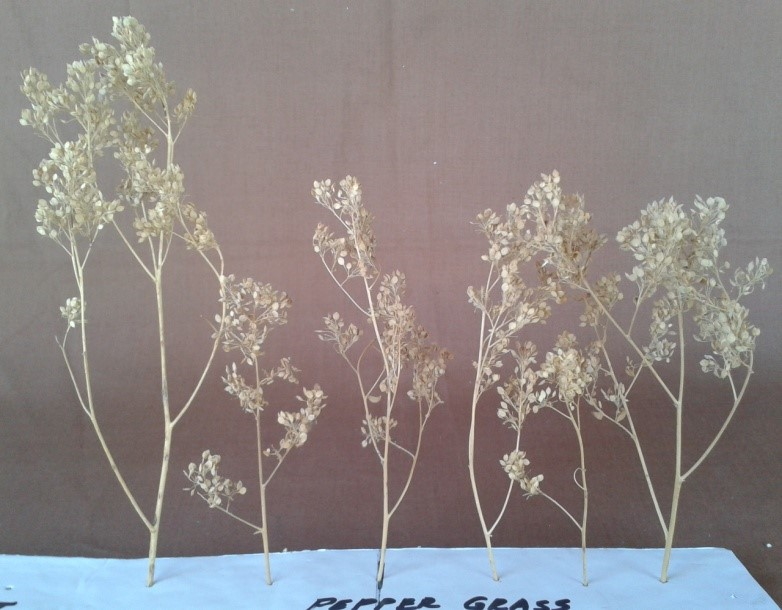
Trees made of natural materials Weeds - These are great because if they grow nearby, they're free. All you have to do is go and pick them. Look around your neighborhood and see what's there. The best time to harvest is in the fall because most die and dry up as winter approaches. Don't bother with green weeds. They will dry up after you pick them and will look completely different. The varieties are often different in different parts of the country. Some of these from the northeast include: wild oregano, hardhacket, meadowsweet and sumac. The first three represent deciduous trees. (Leaf type trees that lose their leaves in the winter time.) Sumac mimics a conifer (Evergreens, or cone bearing trees). Peppergrass makes great deciduous trees and can be found in some of the mountain states along with sagebrush which makes great armatures for large foreground leaf trees. Pepper grass found in Rockies can be used for back ground trees or made into detailed for foreground trees ground trees.
Lichen is a plant that often grows in the alpine tundra yet grows in Florida as well. Wild lichen needs to be treated with glycerin or it gets very brittle.
 Treated lichen from craft store
Lichen has long been used as foliage to fill in a tree armature (trunk and branches), but some people glue bunches of lichen together to form a forest cover without trunks. You can buy lichen in hobby shops and some craft stores. It is used less often today because many modelers find the density and texture of lichen to be unrealistic.
Supertrees is a weed sold in hobby shops and, in the opinion of many, makes the best deciduous trees available today.
Making Super Trees from Supertree Material - Pull out the material and separate the stalks being careful not to break any. Look at each stalk to find the best "tree". This will likely involve snapping off some branches and may even yield two trees. Also, using tweezers pick out any leaves. They grow from the main stalk and are about 3/8"to 1/2" long and narrow. You will likely also note that most of the main stalks have a bend to them. This is easily straightened. Heat up a soldering iron. Next holding the trunk of the tree so the convex side of the bend is up, gently push the top of the tree against a hard surface, so it wants to straighten the trunk and run the hot iron along the convex side of the trunk where it is curved. Low and behold, it will straighten. Next spray the tree with a spray can of flat gray or brown paint and immediately sprinkle on fine ground foam or leaf bits. The latter are tiny bits of colored paper about the size of real leaves. To add more, spray again this time with hairspray and sprinkle on more. Done!
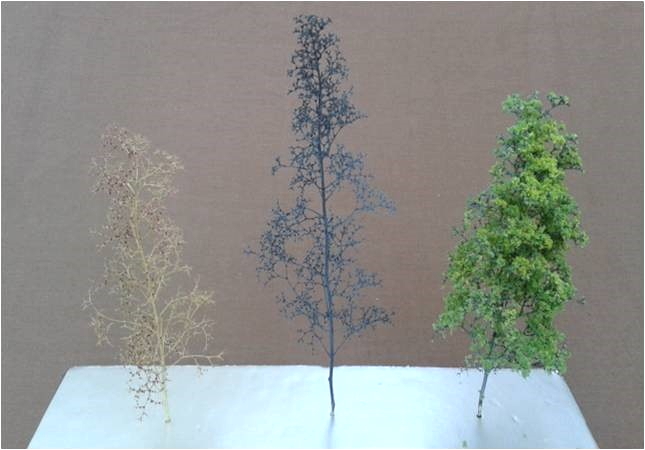 Left is a stalk of Supertree material trimmed and straightened, middle shows trunk sprayed gray (or brown) & right flocked with green ground foam or leaf bits
Manmade Trees - Lots of both deciduous and coniferous trees are available from dealers or can be made at home. They consist of plastic or wound wire armatures with ground foam foliage from several manufacturers such as Woodland Scenics, Heki, Noch, Bachman and Scenic Express. Most are fairly expensive to use as background trees.
 Sagebrush armature with weed springs glued on its branches great background trees
Making Your Own - Given the cost this is a good option. For deciduous trees you can get plastic armatures which can be populated with foliage clumps from some of the companies cited above. You can twist stranded wires together to make your own armatures and apply commercial foliage. And again, sagebrush armatures can be used. It is not hard to make wind-up fir or spruce trees. Secure a soft steel wire 18 to 20 gauge (awg) folded back on itself. Secure the end you folded back in a vise and put jute or sisal fibers between the folds over the length you want as the height of the tree. Then put the two ends of the folded wire in your hand drill and slowly rotate the drill. This winds up the fibers making the tree. Seems hard; it isn't.
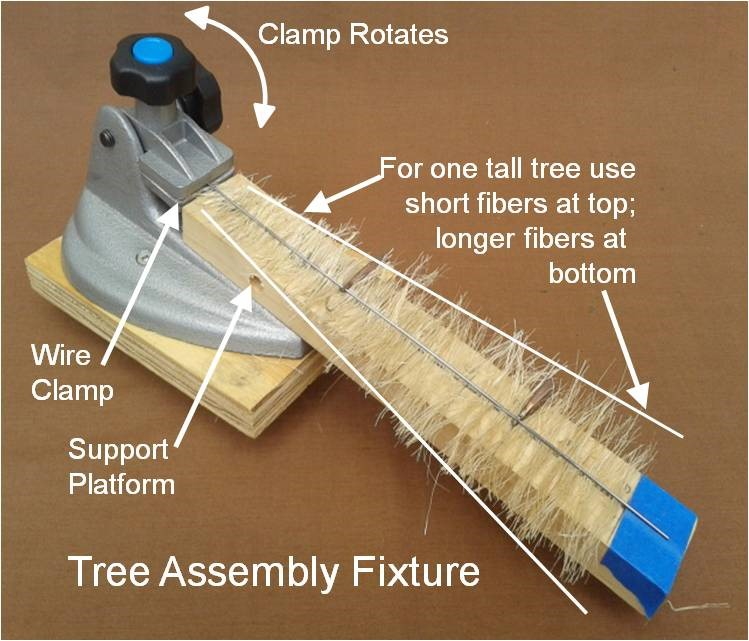 Making a jig to support the fibers when you are inserting them helps a bit. Then slowly spin the two wires and the cone shaped tree forms.
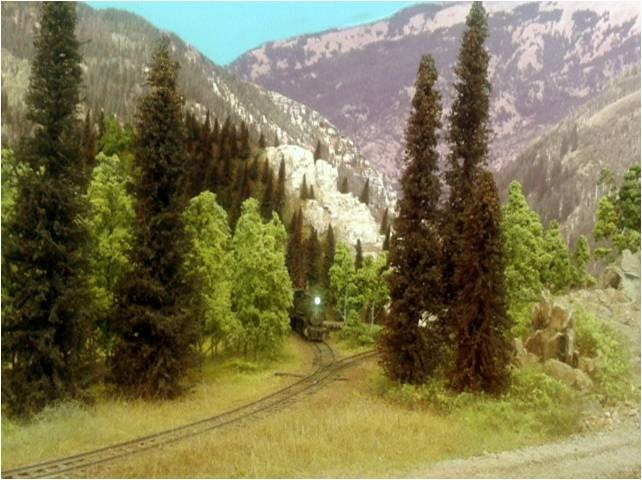 Both fir and deciduous trees planted into Styrofoam over static grass & bushes
Planting Trees - Planting trees should be a last step in creating your scenery simply because it is much harder to add bushes, grass, etc. when you have to work around and under trees. The trunk of your trees should have a slight extension, say 1/2" that is tapered to a point or a wire inserted in the trunk. Inserting trees in foam scenery is much easier than the plaster gauze variety because there is depth to the foam to support the tree, so using an awl poke a small hole and insert the tree. For plaster gauze scenery poke a small hole, apply some white glue and do your best to keep the tree straight until it dries. A spot of hot glue might do the trick if that doesn't work.
Streams, Rivers, Ponds and Harbors
Generally these features occur below track level. That requires cutting through the plywood if that is the base of your layout. On the other hand, if you prefer a single sheet for your layout base, all your track roadbed needs to be slightly elevated and inch or so. Another approach is to put a sheet of foam board on your plywood base.
This allows you to carve into that for your water feature below the track level. That said, mark the boundaries of the waterway and construct your landform. The bottom should be roughly level or with a very slight grade unless, of course you are planning a cascade with waterfalls. If the water feature, be it a stream, river, or pond is shallow, the bottom can be seen, so paint it. If it is a deep river or a harbor scene, you likely can't see the bottom, so give it a flat bottom 1/4" to 1/2" below the intended water level. You will then need to paint the bottom a dark brown, gray or even black reflecting the color of the water that you observe when you look at similar features in the real world.
 Bare foam board to left: painted with rocks & ground cover on right
Adding the Water - Sometimes ripple glass or plastic cut to shape is employed for ponds or harbor scenes. However, the most frequent approach is to use clear resin to simulate water. Envirotex is used most often. It's carried by most hobby shops and craft stores. Generally, it is poured to a depth of 1/4" to 1/2" as making it deeper doesn't add anything. Another thing you need to do is to make sure the water feature has actual banks on all sides because the resin is self-leveling, that is if there is a hole or a low spot it will flow out and wind up on the floor, so be forewarned. When you are ready to do the pour, mix the resin and hardener. Envirotex calls for a 1:1 mix. Then go ahead and pour it distributing along the stream or around the pond. It is very viscous and will take a while to level out. You can do several pours if needed. It will start to set after 15 to 20 minutes from the time of mixing. When it does, leave it alone. People sometimes try to work the surface at this time to simulate waves, but don't. It seldom works out, and there is a much better way to simulate these aspects. Let it sit overnight.
 Resin only on left; overcoated with gloss medium gel for clear waves & white latex caulk for white water on right
Making Waves - Once the resin sets you can add these features. You'll need several items: gloss medium gel, gloss medium and white latex caulk (no silicone). Using a small brush apply some gel to your water. This will allow you to tease up some waves and will keep its shape. Think about how the currents might be in a stream, pond or harbor. Check out some photos. (Google Images) The gel goes on white but dries clear, so if you want white water rapids, use a little of the white caulk. All of this takes a bit of experimenting, but you quickly get the hang of it. When the gel and caulk dry, you can paint on a coat of gloss medium to make it all shine.
So, there you have it. With the knowledge of how to create landforms, vegetation and water, you can create a wide variety of scenery for your model railroad, module or diorama. Enjoy!
Ballast
Although some modelers like to ballast their track right before doing the rest of the scenery, most add the ballast last. After all, in the ‘real world’ railroads add their ballast over the existing scenery. For most model railroaders, spreading ballast is not one of their favorite jobs – especially around turnouts. However, it does finish a scene.
 Well ballasted track can really finish a scene
Ballast comes in a few sizes and several colors. Most railroads today use granite and thus it is gray in color. However, if granite is not readily available near the railroad, they often use what is locally available. Thus, you will see tan/brown ballast used as well. The choice is up to you. Scale ballast is available in several different colors and different manufacturers use different base materials to make their ballast including crushed/died nut shells and even real crushed stone.
If you are using cork roadbed, you should sand it and give it a base coat of paint in the same color as the ballast you intend to use. This was covered in
Part 4 of this Guide. (Laying Track). You should also weather your track and ties before spreading the ballast.
Warning: Remember that the flanges on the wheels of your motive power and rolling stock ride on the inside of the rails. That area needs to be clear of any remnants of ballast. If you keep the tops of the ties – especially between the rails – clear of ballast, you will have no problems.
Tip: Spread and groom the ballast over several feet of roadbed before adding any glue. If you put any glue down first, the ballast will get gooey and you will not be able to move it where you want it to be. Get everything the way you want it, and then add the glue as described below. If you do it this way, you can always vacuum the ballast up before adding the glue if you really don’t like what you’ve done.
Tools: A small paper cup of plastic spoon to spread the ballast. A small foam paint edger (1” to 2” wide), small foam brushes, one trimmed to fit between the rails in your scale, and a stiff cheap ¼” flat paint brush are your primary ballast spreaders.

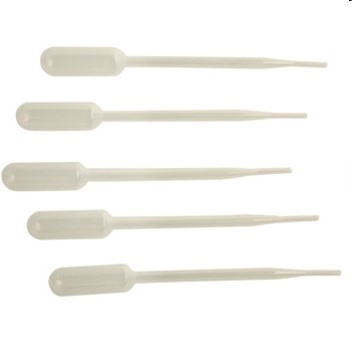 One type of foam paint edger, a foam brush trimmed to fit between the rails, and some pipettes
Some plastic pipettes to apply 'wet water' (described below) and diluted white glue or diluted matte medium. A damp cloth to clean any wet glue off the top of the rails.
Definitions:
Wet Water: Water mixed with a few drops of dish detergent, or water mixed with 70% Isopropyl (rubbing) alcohol. For the latter, a good mix is about 20% of the rubbing alcohol to 80% water.
Diluted White Glue: Put some white glue in a small plastic bottle with a good airtight lid. Add enough water (stirring constantly) until you get the look and consistency of milk. This will keep in the bottle for a long time as long as the seal is good. Just shake it well before use.
Steps:
- Using the small paper cup or a plastic spoon, spread a little ballast outside the rails, allowing some to fall down the sides of the cork roadbed. Then add some more ballast between the rails, bringing it up to about rail level. Never fear, in the next step you will get the ballast down to the ties (and off the ties) and the excess will flow outside the rails and down the sides of the roadbed.
- Take your paint edger and run it gently over the tops of the rails – back and forth a few times. Touch up the grooming with the foam paint brush. Flick any residual ballast away from where the wheel flanges will run and off the tops of the ties using the ¼” stiff paint brush. Continue these steps until you get the look you want.
 A slightly different designed paint edger spreading the ballast as described above
- Once you get the dry ballast looking good, it is time to add the glue. The first step it to thoroughly wet the ballast with the ‘wet water’. You can do that with either a spray bottle or with a pipette. Either way, continue wetting until you see the dampness seeping out the edges of the ballast at the bottom of the sides of the roadbed. If using a pipette, you need to develop a method of flowing the liquid out without heavy squirts. Squirts will displace your nicely groomed ballast. Once you have wet about 2’ of ballast, it is time to add the diluted white glue (or diluted matte medium) before the ballast dries. A pipette is easier to clean, so flow the glue down the middle of the track until you see it leaking out the bottom of the sides of the roadbed. Then wet the track again. Once you apply the glue, do not try to adjust the ballast. It will lead to a mess. Allow to dry overnight. If some pieces of ballast have ended up on the top of the ties, use a flat bladed screw driver or hobby knife to flick them off.
Ballasting turnouts
Tip: If you have a friend who has experience ballasting turnouts, invite that friend over for a ‘ballasting party’.
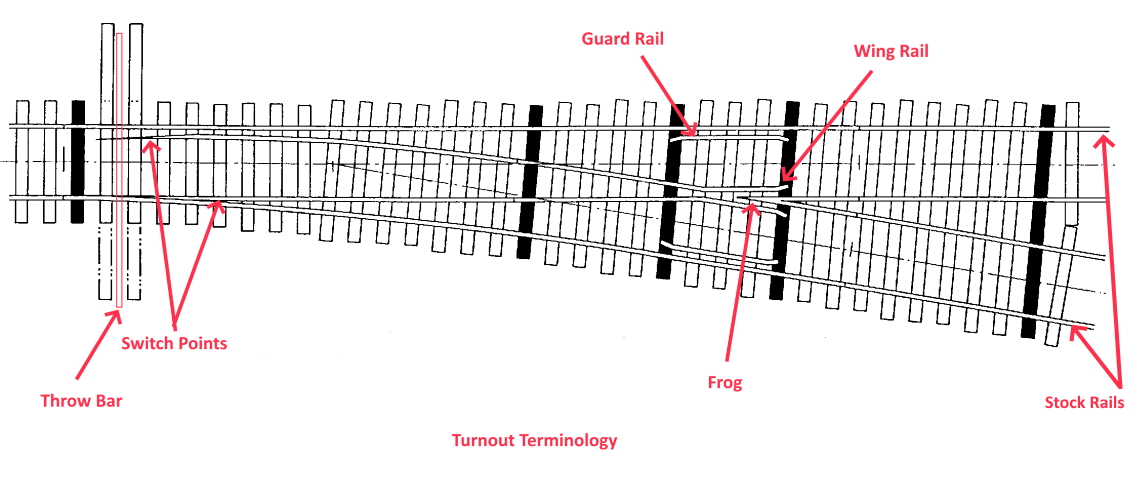
First some terminology:
When placing the dry ballast in and around a turnout, picture where the wheel flanges will go. So, place no ballast between the frog and the wing rails, no ballast between the guard rails and the outer ‘stock’ rails, no ballast between the switch points and the stock rails for the last 25% of their length, and no ballast around the throw bar. When adding the glue, keep it away from the throw bar and the switch points. From time to time, move the throw bar back and forth while the glue is drying.
Videos and On-Line Resources