
Model Railroad Engineer-Electrical is one of the traditional categories for earning a Master Model Railroader certificate. I would like to examine the requirements in detail and show you some easy examples of how you can get this award.
If you are not familiar with electrical technology or are a little rusty, a good investment to charge your capacitor would be two Kalmbach books: How to Wire Your Model Railroad by Linn Westcott. This is an old standby written before the semi-conductor was in common use on model railroads. The other book: Basic Electricity and Electronics for Model Railroaders by Don Fiehmann is an up-to-date treatise on model railroad wiring and circuitry, but it spends less time on basics.
The requirements for the electrical certificate are divided into five sections labeled A through E. Section A specializes in the extent of the railroad and its control; B. the wiring and operation of the train; C, non-propulsion features of the layout; D, the drawing of electrical schematic diagrams; and E deals with filling out the SOQ (statement of qualification). These requirements not only encompass the conventional two-rail pike, whether standard or narrow gauge, but also traction layouts with or without electrified overhead wire and three-rail layouts with inside or outside third rail.
In addition, your work can be done on a club layout or your own pike or someone else's, or a combination.
Before we get started, I'd like to point out that the requirements are not meant to be intimidating. You can qualify even if you have a simple layout. Possibly, you might have to make a few additions or changes to your pike, which is common.
This section asks you to "construct and demonstrate... the satisfactory operation of an electrical control system, capable of simultaneous and independent operation of two mainline trains in either direction with at least: (1) five electrical blocks... " What first came to mind when I read this was a very large double-track mainline pike with five long blocks. Therefore, I built my first pike with this configuration so that I could qualify. Actually, all you need is one single track, running from point A to point B. with five blocks. This sounds pretty long.
But wait a minute, there is no requirement for how long a block or a train has to be. A train could be a short switcher and one car. Also note that the operation does not have to be continuous. Conceivably then, a layout with three short blocks and a two-block passing siding in the middle would qualify. Locomotives could be placed at each end and started off toward each other, passing near the center.
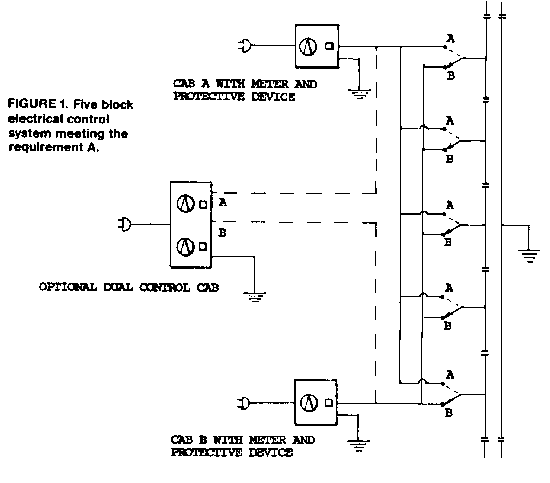
Requirement A (1) means you need two independent speed and direction controls either one of which can be connected to each block. This scheme is shown in Fig. 1. Notice that by throwing the toggle switches, each block can be selected for Cab A or Cab B. You can use two separate power supplies or a dual power unit.
The other requirement in section A calls for the layout to have at least one mainline passing siding (Item 2); (3) one reversing loop, wye, turntable or transfer table; (4) one yard with a minimum of three tracks and a switching lead independent of the main line; (5) facilities for storing two unused motive power units; and (6) one power supply with meter(s) and protective devices to ensure safe operation of the supply.
If you are missing any of these items, commercial products are available and fairly simple to install.
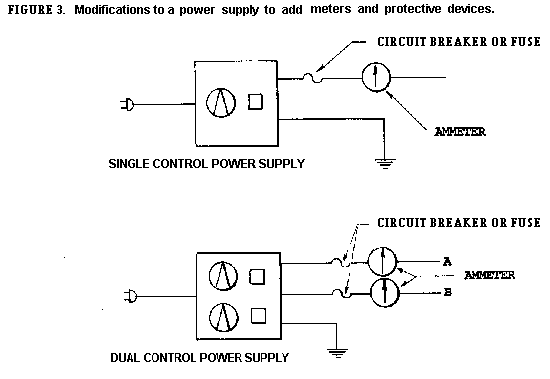
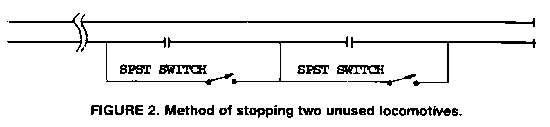
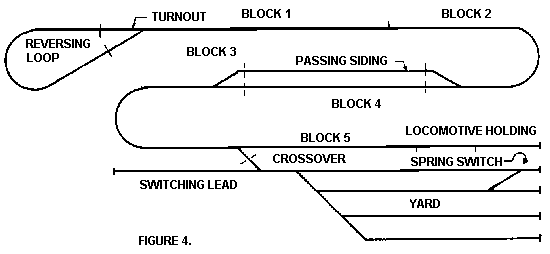
Wiring is not difficult when you follow the instructions that come with the parts or refer to the books I recommended. For example, Item 5 requires cutting one rail of the track so that two isolated blocks result. The isolated cut rails can be insulated with a plastic spacer, then connected to the adjacent rail through a single pole toggle switch. The requirements do not say where this switch has to be located. Figure 2 shows this simple schematic. If meters are installed, Fig. 3 shows how to do this using ammeters with a zero center. Also remember most power supplies come with overload protection. However, if yours does not have a protective device, then add a fuse or circuit breaker. Figure 4 shows a reasonable, small layout that fits all the requirements in section A.
Now let's look at section B. You have the choice of three of 11 track items to wire and demonstrate the operation. Figure 5 shows what these look like. It is notable that a double slip turnout is omitted from the list. This can be considered since it is, in reality, two singleslip turnouts. Actually, any type of weird turnout you have wired and demonstrated satisfactory operation over can qualify.
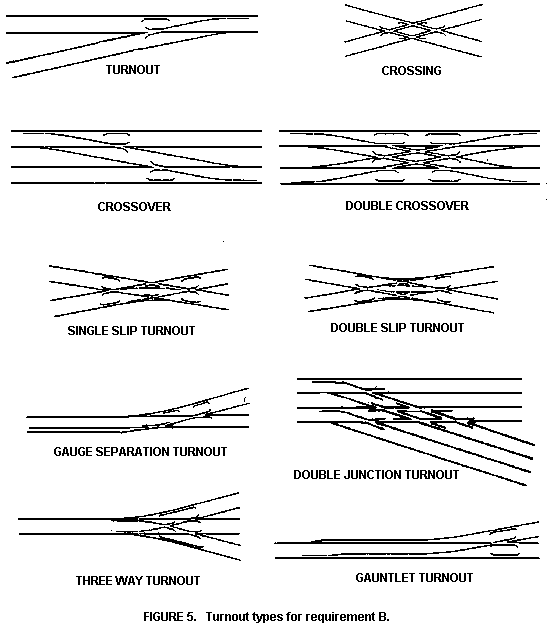
Again, don't read more than what is required. For example, it does not say you must build these turnouts, commercial parts are acceptable.
All the layouts I have seen have at least one turnout, and I bet yours does too. So that takes care of one item. Now pick out two more that you think you could handle. Notice the Fig. 4 example, there are several turnouts and crossovers. So you would need to add one more type. An option would be to convert the upper turnout in the crossover to a spring turnout to meet the third requirement. Admittedly this arrangement might cause some inconvenience in other operations. There is no reason why you cannot convert it back again after you receive your certificate.
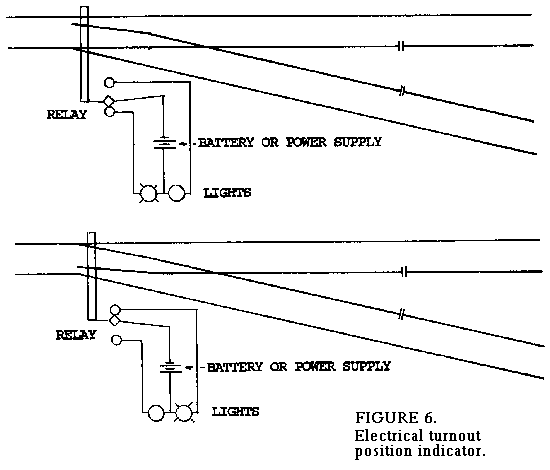
This part concerns non-propulsion electrical features of the layout. You need to wire and demonstrate the satisfactory operation of three of 21 features. These range from simple to complex, but remember in many cases commercial components can be used. Let's look at the easy ones... (1) Turnout position indicators (minimum of four). If your turnouts are electrically operated, just connect a light to the spare contacts (if available) of the switch machine. Figure 6 shows the wiring. For a power supply you don't need anything fancy. How about some dry cell batteries.
(3) Cab control (dual)... this is merely an extension of Requirement A (1). See Fig. 7, note that Cab A uses double pole double throw switches to interlock against the possibility of Cab B's feeding into the same block at the same time.

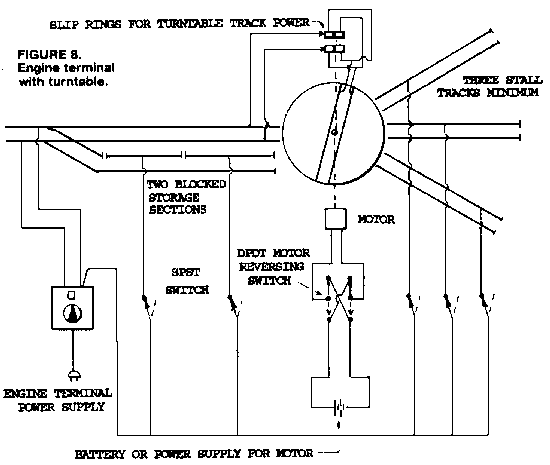
(4) Engine terminal turntable or transfer table (minimum three stalls and two blocked sections outside for parking). If you don't want to purchase this item, you can build one (see Fig. 8). There is no need for a fancy indexing mechanism, just a motor and toggle switch. You might want to put a push button in the motor circuit for ease of jogging the rails into position.
(5) Trackside Interlocking Signals (two junctions). Figure 9 shows how to do this. As long as you use a switch motor with two sets of single pole-double throw contacts (called double pole-double throw) you are all set. Use one set to isolate the power to the rail leading to the switch and the other pair to operate the signal light. Note that a similar set of lights can lead to a control panel to meet Requirement 1.
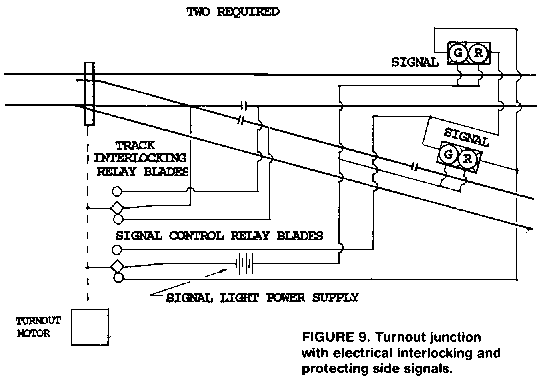
Figure 9. Turnout junction with electrical interlocking and protected side signals
(8) Grade Crossing Warning. Refer to Fig. 10. Use commercial parts for the flashing lights, a flasher, and a switch connected to a power supply. The requirement does not call for an optical track occupancy detector, unless you prefer it.
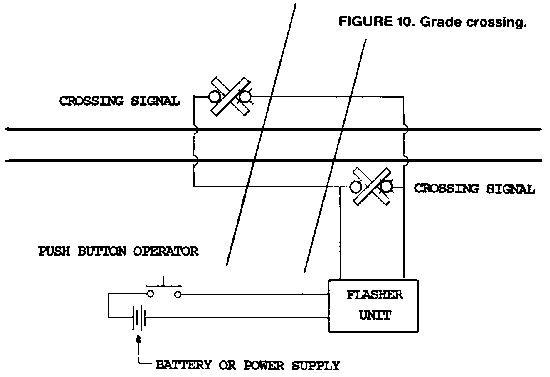
Figure 10. Grade crossing.
(10) Overhead Wire Operation. This is a snap if you are in traction or model an overhead electric railroad.
NOTE: On the witness certification form, in part C. item 11, credit is given for third rail operation. It was removed from the current regulations and made a "note," since it is a recognized method of propulsion. However, since it is a unique electrical accessory to the operation of the train, it will qualify for one of the requirements in this section. Therefore, on the witness form the total extends to 22 items.
(Regulation Item 12) Animated Displays. Here are two suggestions: a sequentially lighted sign and a motor-operated windmill.
(13) Lighting Displays. How about street and building lights using a switch. A nicer touch, but not necessary, would be a timer control. The other items may be more complicated and expensive. If you have them, count them; you need only three.
Notice item C (14 to 20) requires that commercially assembled complete units not be used. Here is an example that will clarify the intent. You cannot take credit for a locomotive or car that you buy with a sound system installed in it. However, if you buy or build the locomotive/car and sound system separately, and you install the system, you can take credit (see photo 1).
Photo 1. For part C, item 14. An Athearn HO scale S12 locomotive with a Modeltronics diesel sound system. Model and photo by Mike Collins.
(Item 21) Other. Perhaps this could apply to a flashing warning light on a locomotive, end-of-train device or caboose (see photo 2).
Photo 2. An example for requirement C (the last item, "other"). A Bev-Bel Athern wide vision caboose with a battery operated flashing warning light under the end of the roof. The on/off switch is on the side under the cabin floor. Model and photo by Mike Collins.
This section asks you to prepare an electrical schematic drawing of the model railroad in A. It must show the rail gaps, blocks, feeders (rail power), speed and direction control, electrical switches and power supplies.
I suggest you draw these diagrams in black pencil. I do not use colors, but that's your option.
I like to use paper that is ruled with light blue 1/4" squares. The schematics should be neat and readable. You must also make individual schematics on the three items in C. I suggest you put each one on an individual sheet of paper and label them clearly as to which requirement they are for.
There are no hard and fast rules on how the schematics should look or what symbols to use. Follow the examples in the books, that's what I've used in the examples, and you can't go wrong.
You need to do a good job on your drawings, since these will be verified at different levels (local, regional and national).
MMR Bill Bell also thinks diagrams are a good idea even if you are not interested in the Electrical certificate. Recording your electrical work will give you some insurance, since memory fades regarding details if you need to repair or modify your circuits. In Bill's 40 years of experience, using a terminal panel with disconnect capability in short sections (blocks) of trackage has paid off as the inevitable changes or extensions occur. Also, troubleshooting is easier if any gremlins attack the system. On his railroad, the Palouse & Pacific, he has all the requirements in part A, seven of the 11 items in B; and 10 of the 21 in part C. Getting the Electrical certificate was not a problem. Bill endorses the How to Wire Your Model Railroad book as the best electrical guide.
Your last requirement, E. asks you to submit a completed Statement of Qualification (SOQ) as found on this page, a track plan, a description of the track work features, method of electrical construction and list of commercial components used.
To get the proper forms, call or write your divisional or regional AP Manager. Request a SOQ, a copy of the regulations (or see the January 1993 Bulletin), and a witness check-off certification form. When all the forms are completed and signed, send them to your regional AP Manager.
Congratulations, you're now a MR electrical expert, maybe an electronic wizard, your code name is Merlin the Magician.