For merit merit award or contest judging, models are evaluated on the basis of construction, detail, conformity, finish, lettering, and scratchbuilding. It takes 87.5 of the 125 available judging points to win a merit award.
Having served as my region's AP Manager, I know from the mail I received and the comments made directly to me at contests and meetings that the prospect of having to vie for merit points is intimidating to many modelers, including some very good ones. It can be particularly forbidding to those who prefer to build from kits. Without scratchbuilding at least a portion of any model, these modelers must earn all their points from a total of only 100, inasmuch as they will not be eligible for any of the 15 points allocated to the evaluation of "scratchmanship."
So let's see if we can help some of you overcome your fears of being judged, and we'll do it by pointing out some of the areas of car-building that deserve attention and by helping you understand how judges look at models.
To begin with, please remember that when you submit a model of any kind for merit judging, you should never assume that the judges will know the prototype, or that they will understand what you did, or why you did it. Especially when the model is a freelance version, you need to offer a rationale for its existence. If you have pictures of the prototype, or drawings that you can "lend" to the judges for reference, attach them to the judging form. At least write (legibly) supporting statements to attach to the judging form and please keep your notes to the point and as brief as possible.
Some modelers write long essays that consume far too much of the judges' time without providing an equal volume of illumination. I concede that I have been guilty of this myself, and once, when I entered three similar cars in a contest, the judges candidly told me that they had read one of my "term papers" and ignored the other two, figuring - since the cars were similar - that there wouldn't be that much difference between the documents. In fact, there were significant differences, because I had used the three cars to experiment with methods of construction, scratchbuilding and detailing. (Fortunately, I earned the required points on all three models, but the differences between scores was miniscule and my excessive verbiage cost me bonus points for extra fabrication work.) I learned my lesson.
It will help you to understand and be considerate of the merit judges if you remember that they are themselves merit award-winning, and often contest-winning, modelers. If you tell them the materials you used or that you made jigs, molds or patterns, they will understand the terminology. They may not know the specific difference between a hopper manufactured by ACF for the L&N Railroad and another one made for Burlington, or that your specific prototype modified the car you are modeling in their own shops to fit an unusual application. That is the kind of support information they need from you if they're going to evaluate you properly on conformity and detail.
I was very timid about entering cars in contests for a long time. I was cured of my timidity when my first entry earned 103 points and second place at a regional convention, but I really struggled with that one. I knew the judges were tough, so I planned ahead and built an HO scale 36 foot wood boxcar almost entirely from scratch. I didn't go so far as abandoning scribed siding for individual board construction (though I've done that since), but I sheathed the box (inside horizontally and outside vertically), built my own doors and the channels in which they operated, formed my own steps and grabirons, reworked some old metal queen post castings, made my own bolsters, installed full brake rigging using only one reworked commercial casting that was drilled to accept all the required piping, and disassembled the trucks to clean up the castings. I also researched old construction drawings so that my frame details and all safety appliances would be true to the prototype.
I made sure the construction details were clean and neat. No glue showed anywhere. All joints were tight, grabirons were straight and there was no 'fuzz' on any of the boards. It was very important to me that all of the truss rods were evenly aligned for appearance. I painted the model very carefully, applied dry transfer lettering (which I prefer to decals on wood) with attention to spacing, and weathered the finished car moderately.
I was very careful with the attachment of the trucks to the bolsters to ensure the car would ride level and naturally, I made sure the truck truss rods would not foul the trucks when the car negotiated a short radius. This may seem an obvious, essential point to many of you, but I have judged a lot of contests, and you might be amazed to find out how many modelers are not attentive to this detail.
Please note that the AP requirements for Master Builder-Cars state that the applicant must build "operable" scale models. Once, I almost granted a merit award to a really fine-looking model car that not only wouldn't negotiate a reasonable radius, it wouldn't even roll. I discovered the problem when I lifted the model to examine the truss-rod detail.
Many judges are reluctant to lift a model from the contest table to examine it closely (sometimes they're specifically instructed not to). They never know when or if a part will fall off, and accidents do happen. But when you've gone to the trouble to build a car with a lot of good underbody detail, you want to be sure this is seen by the judges. One way to ensure that the judges will be attentive to your work is to make a note on the judging form explaining that the model may be lifted for inspection.

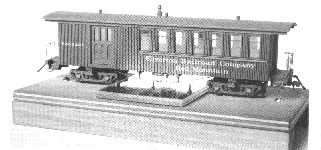
Bruce Nall's award winning passenger car is displayed on a stand that includes a mirror to allow judges to examine the underbody details without lifting the model.
My 36-foot boxcar was displayed on a small piece of mirror that I had cut to size by a local glass dealer. It was inexpensive, and I have since had a number of pieces cut for displaying different size models.
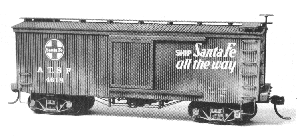
I am a strong believer in being my own harshest critic. I figure that if I am not self-critical, I'm going to get a double dose from someone else. And frankly, I'm not sure I would have given my boxcar 103 points. I've included a picture of it with this artide so you can judge it for yourself, but first, listen to my own criticisms. (Ignore the coupler size, please; I built it to run on my layout where Kadee is standard.)
The glaring fault is with the doors. The channels on which they slide are out of scale, and I should have installed more hardware. The truss rod turnbuckles are a bit larger than would be prototypical, and look at the space between the roof and roofwalk. I don't especially like the way the weathering looks in this photograph, but I went into the layout room to check it out a while ago, and it looks a lot better on the actual model. My friends who are Santa Fe buffs may take me to task for not adequately researching the car markings and logo style, and I confess that I did not consider their sometimes fragile sensibilities. I apologize.

The Author's HO scale scratchbuilt model of a 36-foot boxcar was his first car entered in an NMRA contest. It won a merit award and second place, helping him to overcome his reluctance to enter contests.
Indeed, this model has its flaws, but it did earn a merit award and, even more importantly, I learned something from building it. I had fun building it, and it helped me overcome my reluctance to enter contests. As a result of my work, I produced a car that operates extremely well - better than many kit-built models.
Let's turn our attention now to building and super detailing models from kits.
It's pretty hard to do with plastic models and it's very difficult to do with streamline modern passenger cars. Judges evaluate construction, in part, by the complexity of the model or the difficulty they perceive in building it. Heavyweight and old-time passenger cars, maintenance-of-way equipment, and cabooses are perceived as requiring more effort, and that may be true when the model is built from a kit. Such an assumption is not usually made when the model is scratchbuilt.
The addition - or refinement of detail parts can improve the appearance of any kit model I've ever seen. And when you attend to these, you have opportunities to earn extra detail points and to try your hand at scratchbuilding various components.
If your kit is made of plastic, began looking at the possibilities by examining the cast-on details. You may be able to substantially improve the car's appearance by grinding off the cast features and replacing them with parts you fabricate yourself. Very effective and accurately scaled grabirons, steps and railings can be made in all of the larger scales (HO and larger), and hinges, latches, corner straps, stake pockets, valves and other small parts may be improved with scratchbuilt replacements or commercially available detail parts. You might also consider scratchbuilding a load for open cars, or an interior for a boxcar with a door open to reveal it.
Ladders are a detail that can be improved on virtually any kit. Much "ladder stock," particularly in HO scale, tends to be relatively crude and over scale. Fortunately for those who are not scratchbuilders, there are a wealth of replacement details available commercially. And take a careful look at the brake wheel; sometimes you can replace the ones that come with your kit with wheels that have better detail or ones that are more accurately scaled
In S, O, G and larger scale, it is especially important to model as much prototypical detail as you can, because the absence of detail becomes increasingly obvious as models become larger and every part and its texture becomes more visible.
Couplers, glad hands, uncoupling levers, underbody piping, brake cylinders, brake levers, chains, hangers, and even brake shoes, are all interesting features that are not essential on an operating model, but they significantly enhance the appearance of a contest entry and improve its merit score potential. On passenger equipment, such details as air reservoirs, brake components, generators, air conditioners, battery and tool boxes, air vents, radio antennae, and roofing fabric can make tremendous improvements in the appearance and authenticity of the model.
Up to this point, I haven't mentioned interior detailing, but this is a good way to improve any passenger car, maintenance-of-way or caboose model. Seating, Lighting, partitions, ceiling details, window shades and curtains, dining car and kitchen details, RPO details and the like significantly increase your point-earning potential and really add interest to your model's appearance. (Figures don't earn points in merit judging except in the display category.) Most modelers who add interior details show their handiwork by making the roof of the model removable for display. This requires care to ensure a good fit between roof, car sides and the ends.

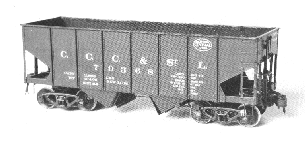
Jim Tangney's scratchbuilt HO scale 55-ton hopper won a first place award at the NMRA national convention. This model built of brass features fine scale detailing, operating doors and latches, operating journal box covers, and a brake system that operates completely from the handbrake and cylinder down to the brake shoes at each wheel.
Anytime you can create scale details that operate - like hopper doors, ice hatches, hinges or brake systems you will improve your scoring chances. The accompanying photograph of Jim Tangney's 55-ton hopper is a fine example of this point.
And remember that no matter how much detail you put on a model, it only works to your advantage when it is a good, clean, accurately applied and accurately scaled detail. It can never be viewed as a substitute for quality construction. When a merit judge evaluates your model for detail and conformity, he/she does check the accuracy and quantity of detail, but if your work isn't clean, he/she may deduct as many points from the construction category as he/she adds under detail. You may earn little or nothing for your effort.
And speaking of basic construction, don't overlook kitbashing or kit-mingling opportunities. You can combine parts from different kits to produce a model for which no one kit is readily available. You can modify a kit to produce a special model that reflects a specific railroad's modifications. And you can produce a conversation piece for your personal railroad that serves a "unique" function. If you intend to enter the latter example in a contest, however, remember the conformity category. The judges will want to know if what you have done makes sense in prototype practice.
Finally, a few comments on painting, lettering and weathering. We all have seen models that were well constructed up to this point and ruined by uneven or heavy paint applications and thoughtless or sloppy lettering and weathering. Here are some tips.
First, learn how to use an airbrush nothing else works as well for finishing a model evenly. Spray paint cans can be used effectively, but the least expensive external mix airbrush will do a significantly better job. Some modelers are wizards with a brush, but most are not and even the best cannot match the results obtained with an airbrush.
Mix your paint carefully so that it is thin but opaque and sprays without excessive air pressure. Don't use the "brush" too close to the surface of the model, or the application may be too heavy and will run. If you spray from too great a distance, the paint may begin to dry before it bonds to the model's surface. This produces a stippled or lightly textured result that competes with small details like rivets.
The application of lettering must be done with care to keep it straight and to space it evenly. I realize that the prototype often did not space letters evenly, especially on ribbed-on-outside braced cars, but in recent years, their techniques have improved and modern equipment is generally well done with considerable attention to esthetics. Uneven lettering is even more distracting on a model simply because it is a model. You look at a model differently than you look at the prototype.
Dry transfers are burnished onto a model so that no "film" remains around the individual letters or logos, but decals are another matter. Even with careful trimming, there tends to be some relief that makes a decal more noticeable, unless the modeler exercises great care in applying final coats of lacquer.
After your decals are in place, "snuggled" down and thoroughly dry, they will still be noticeable because of their thickness and the contrast between their glossy appearance and the finish of the surface around them. This difference can't simply be hidden under a dulling spray. First you must spray the entire model with a clear glossy lacquer to make all the surfaces match. After that spray dries, a coat of a dulling lacquer will do a much better job of hiding the decals.
I said earlier that I prefer dry transfers on wood, and the preceding paragraph helps explain why. I don't like to to hide the texture of wood - even painted wood - under lacquers.
When you weather, approach the process cautiously. Of course, you don't have to weather your model at all, but understand that even a car that is recently out of the shops will have some dust on it. Weathering is always appropriate, but you need to understand how much is enough and where to apply it.
Your best reference is the prototype. If you don't have photographs of your own, look at those in the magazines (don't look at model photographs alone. Even those you may think are great will be overdone.)
Notice how road dust comes up from the bottom and often indicates the direction in which the car has been moving. The ends can reveal spattering from the wheels of the car just ahead. Streaks may run down the side from the roof. There may be dirt or grease around the grabs and ladders. The logo and car markings may be faded from age and exposure to weather and the sun. Dirt tends to accumulate on the roof and tank tops, end sills and door hardware. And, of course, don't forget the truck side frames and the wheels. Only the wheel tread is shiny where it is polished against the rail.
When you try to produce the effect of oil spills around the dome of a tank car, remember proper scale. Modelers often use thick paint to achieve this effect and apply it so heavily that the thickness is distracting.
The key to weathering is to use a light touch. Apply your medium sparingly, whether it's chalk, dry brush, airbrush paints, sandblast or chemical bleaching. Often less is more.
I'm always cautious, when discussing merit judging, to avoid overemphasizing the competitive aspect of model building. Many of us who participate in the AP do so out of a desire to compete only with ourselves - to improve over our own past efforts and not to accumulate trophies. The significant hurdle is the 87.5 point "barrier" that must be overcome to earn the merit awards needed for AP certification on the road to becoming a "master" of anything.
Moreover, the modeler who builds for his operation-oriented railroad knows the value of compromise and the process whereby the builder believes a satisfying overall effect in his or her modeling. To such a person, an attempt to make every piece of rolling stock a contest-winning museum piece seems impractical, for the time required in building would be an enormous imposition on the time that could be devoted to the satisfaction of operating. And so, to fulfill one's desire to achieve MMR status, this individual does what's required to earn the Master Builder-Cars certificate, content to set one's own car-building parameters. You build a model that looks good, operates well and exhibits obvious craftsmanship, but stops short of what may be required to win a contest at the regional or national level.