
If you're interested in entering a structure in a contest, there are several guidelines you should know about.
First, construction carries the most point value (maximum 40 points). Most judges start out with 40 points and then start subtracting for poor construction techniques.
A few things the judges look for are excessive amounts of glue, poor fitting joints, parts out of alignment (not square), and how much work you did (so quantity is also important).
Know your skill level ... Quite often contestants are trying so hard to gain points for scratchbuilding, that they lose points overall for sloppy construction. For example, a poor job of building windows may add a few points in "scratchbuilding," but could take off more points for "construction." Points can sometimes be gained by using commercial windows.
Besides the basic tools, if you are going to do a lot of cutting, a chopper is indeed helpful. It is both a time saver and a way to improve construction as it gives both square cuts and precise lengths.
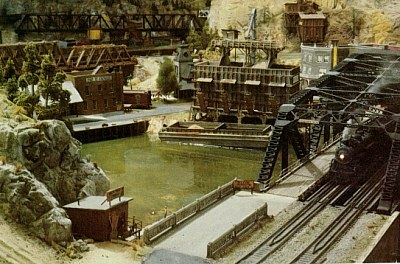
GALVESTON CAUSEWAY BRIDGE and GUS BULK SHIPPERS.
Both models were scratchbuilt. The bascule bridge was the Gold Award winner at the 1970 NMRA St. Louis convention and the barge loader was used for part of the design of a Fine Scale Miniatures kit.
GLUING: To control excessive glue, place a small amount of glue on a scrap of cardstock and use the toothpick to apply the glue to the joint. Then immediately clean off any excess with a damp sponge. If the finish is to be a stain, the parts should be stained before assembling, since any glue will seal the wood and prevent the stain from taking. Otherwise, the result will stand out like a sore thumb and points will be lost.
DUPLICATING: If you need scratchbuild the same part many times, such as windows, ladders, stairs, make yourself a jig. These jigs can be used on later models. Painting your jigs silver will keep the glue from sticking to the jig, thus the parts can be easily removed.
SUB-ASSEMBLY: When building a structure, build it flat. Do not put the walls together until they are completely finished. Lettering, installation of windows, painting, detailing (such as nail impressions) can be done a lot quicker and neater on a flat surface.
LONG & SON WOODEN WARE COMPANY
This model has individual board siding and individual cedar shingles. The windows were scratchbuilt. Leaving some of the windows 'open' was an extra detail feature.
Shingle application takes a lot of time and still may not turn out right unless you practice and find a technique. What used to take me seven evenings now takes two with this method.
Beginning with a well-braced cardstock roof, paint it flat black so any small spaces between the shingle will not be noticeable. Then instead of applying shingles one at a time, I applied them in 3-inch strips. First, stack about four layers of real cedar cigar wrappers; then cut into strips 6 to 12 scale inches wide. No need to measure each one, just cut randomly. Next, lay out three rows of 1/4-inch masking tape (sticky side up) about 4 inches long and about 2 inches apart, pinning the ends. Start laying out the cedar strips across this tape until you have about 3 inches of cedar. Then, for HO, using 1/16-inch chart tape, place rows of tape spaced '/16-inch apart on the cedar. Unpin and remove the masking tape. Then cut along the chart tape with scissors. Thus creating about a 3-inch strip of shingles I/a-inch long. Using a toothpick, apply a small amount of white glue the length of the roof (enough for one row of shingles) then apply the shingles. With a pair of tweezers, grab the chart tape and, with the edge of a single-edge razor blade, hold down the shingles while removing the tape. Repeat for each row, overlapping them about 4 scale inches, thus leaving about 8 scale inches exposed. The prototype's are overlapped about 5 or 6 inches, but 8 scale inches is close enough for eye appeal.
Working all sides of the roof simultaneously, apply only one strip to each side at a time. This drying time will keep the shingles from shifting while removing the tape.
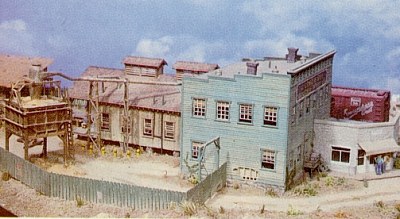
LOWRANCE CHEMICAL COMPANY.
Even though this was a kit, several things such as the storage bunkers, the metal building to the left, the extra tanks to the right, plus the individual cedar shingles would have helped to gain the points necessary for a merit ward.
Comparison of model to its prototype is difficult to judge. If you have added some unique feature, it is a good idea to back it up with a picture or some other facts. Be sure to explain this on your contest entry form. Otherwise, you may lose points since the judges may not know the history. Finish and Lettering
Many points are gained or lost if the painting is not neat and sparingly applied. Too often. One tries to use paint for a filler, which is a poor technique and usually doesn't do the job.
Brush strokes and bare spots lose points. So be sure plastic and metal parts are washed and dried before painting.
For detailed parts, it is usually easier to paint them while on the sprues. Also, it may help to prime them, let them dry fora couple of days and then paint them with a top coat. Then go over them with a thin coat of grime stain to highlight the detail.
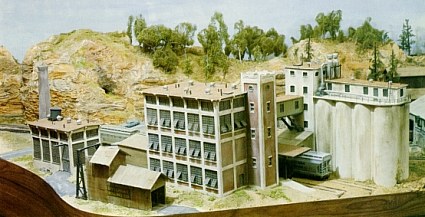
DITLINGER FLOUR MILL.
The prototype mill is in New Braunfels, Texas. The scale model represents about half of the prototype. The model was scratchbuilt except for the windows, which were mainly modified Grandt Line roundhouse windows.
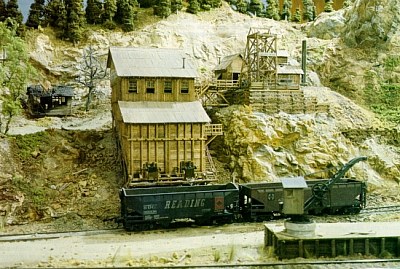
LEANNA MINE
This mine, named after the wife of Bob Ellis, past executive vice president of the NMRA, was scratchbuilt based on a mine in the Cripple Creek, Colo., area. The burned-out house was a little extra detail copied from the technique used by the late John Allen.
You can receive a lot of points in this area. The more raw materials you use, the more points. For example, use individual boards (scale lumber) instead of sheet siding. This is not difficult, but it does take time. First, make a cardstock side, cut out all the openings and paint it flat black. The paint not only keeps any cracks from showing white, but also seals the cardstock to prevent warping.
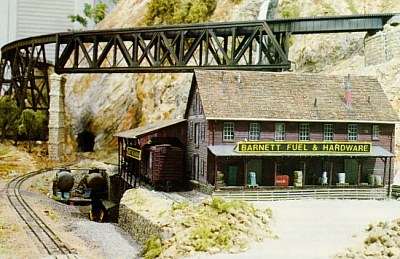
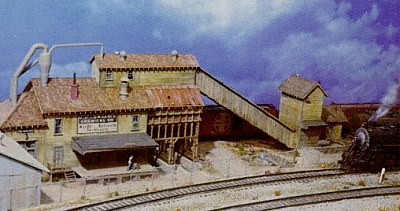
BARNETT FUEL AND HARDWARE
This model was based on the Consumer Fuel article by Jeff Madden, featured in the March 1990 MODEL RAILROADER. A few windows, a truck loading dock, and some oil storage tanks were added. The windows are commercial, the siding is individual boards and the roof is individual cedar shingles applied, as described in this article, in two evenings. This is my most recently built model and I am still using the basics I learned when I was working toward my Master Builder of Structures award.
One of the best things you can do for yourself is to properly and completely fill out the entry form. Remember, you will not be there to tell the judges how you built your model. They have only what you have written down to go by.
Oh, what a feeling! You'll get a great sense of pride from earning a merit award. The experience and techniques you learn will remain with you long after you have received your certificate.
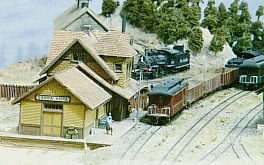
SIERRA VISTA STATION
This model was based on a Rio Grande Southern prototype, however, features of several stations were combined for this model. This model also has my favorite individual board siding, cedar shingles, and scratchbuilt windows.